
- Helm install pod in pending state:
When you execute kubectl get events you will see the following error:
no persistent volumes available for this claim and no storage class is set or
PersistentVolumeClaim is not bound
This error usually comes in kubernetes set with kubeadm.
You will need to create persistentvolume with the following yaml file:kind: PersistentVolume apiVersion: v1 metadata: name: redis-data labels: type: local spec: storageClassName: generic capacity: storage: 8Gi accessModes: - ReadWriteOnce hostPath: path: "/bitnami/redis"create pv with kubectl create -f pv-create.ymlThen you will need to create pvc with following yaml
kind: PersistentVolumeClaim
apiVersion: v1
metadata:
  name: redis-data
spec:
  storageClassName: generic
  accessModes:
    - ReadWriteOnce
  resources:
    requests:
      storage: 8Gi
You will need to create pvc with kubectl create -f pv-claim.ymlCheck the pvc status with kubectl get pvc with status should be bound.
Installing Kubernetes 1.8.1 on centos 7 with flannel
Prerequisites:-
You should have at least two VMs (1 master and 1 slave) with you before creating cluster in order to test full functionality of k8s.
1] Master :-
Minimum of 1 Gb RAM, 1 CPU core and 50 Gb HDD ( suggested )
2] Slave :-
Minimum of 1 Gb RAM, 1 CPU core and 50 Gb HDD ( suggested )
3] Also, make sure of following things.
- Network interconnectivity between VMs.
- hostnames
- Prefer to give Static IP.
- DNS entries
- Disable SELinux
$ vi /etc/selinux/config
- Disable and stop firewall. ( If you are not familiar with firewall )
$ systemctl stop firewalld
$ systemctl disable firewalld
Following steps creates k8s cluster on the above VMs using kubeadm on centos 7.
Step 1] Installing kubelet and kubeadm on all your hosts
$ ARCH=x86_64
$ cat <<EOF > /etc/yum.repos.d/kubernetes.repo
[kubernetes]
name=Kubernetes
baseurl=https://packages.cloud.google.com/yum/repos/kubernetes-el7-${ARCH}
enabled=1
gpgcheck=1
repo_gpgcheck=1
gpgkey=https://packages.cloud.google.com/yum/doc/yum-key.gpg
https://packages.cloud.google.com/yum/doc/rpm-package-key.gpg
EOF
$ setenforce 0
$ yum install -y docker kubelet kubeadm kubectl kubernetes-cni
$ systemctl enable docker && systemctl start docker
$ systemctl enable kubelet && systemctl start kubelet
You might have an issue where the kubelet service does not start. You can see the error in /var/log/messages: If you have an error as follows:
Oct 16 09:55:33 k8s-master kubelet: error: unable to load client CA file /etc/kubernetes/pki/ca.crt: open /etc/kubernetes/pki/ca.crt: no such file or directory
Oct 16 09:55:33 k8s-master systemd: kubelet.service: main process exited, code=exited, status=1/FAILURE
Then you will have to initialize the kubeadm first as in the next step. And the start the kubelet service.
Step 2.1] Initializing your master
$ kubeadm init
Note:-
- execute above command on master node. This command will select one of interface to be used as API server. If you wants to provide another interface please provide “–apiserver-advertise-address=<ip-address>” as an argument. So the whole command will be like this-
$ kubeadm init –apiserver-advertise-address=<ip-address>
- K8s has provided flexibility to use network of your choice like flannel, calico etc. I am using flannel network. For flannel network we need to pass network CIDR explicitly. So now the whole command will be-
$ kubeadm init –apiserver-advertise-address=<ip-address> –pod-network-cidr=10.244.0.0/16
Exa:- $ kubeadm init –apiserver-advertise-address=172.31.14.55 –pod-network-cidr=10.244.0.0/16
Step 2.2] Start using cluster
$ sudo cp /etc/kubernetes/admin.conf $HOME/
$ sudo chown $(id -u):$(id -g) $HOME/admin.conf
$ export KUBECONFIG=$HOME/admin.conf
-> Use same network CIDR as it is also configured in yaml file of flannel that we are going to configure in step 3.
-> At the end you will get one token along with the command, make a note of it, which will be used to join the slaves.
Step 3] Installing a pod network
Different networks are supported by k8s and depends on user choice. For this demo I am using flannel network. As of k8s-1.6, cluster is more secure by default. It uses RBAC ( Role Based Access Control ), so make sure that the network you are going to use has support for RBAC and k8s-1.6.
- Create RBAC Pods :
$ kubectl apply -f https://raw.githubusercontent.com/coreos/flannel/master/Documentation/k8s-manifests/kube-flannel-rbac.yml
Check whether pods are creating or not :
$ kubectl get pods –all-namespaces
- Create Flannel pods :
$ kubectl apply -f https://raw.githubusercontent.com/coreos/flannel/master/Documentation/kube-flannel.yml
Check whether pods are creating or not :
$ kubectl get pods –all-namespaces -o wide
-> at this stage all your pods should be in running state.
-> option “-o wide” will give more details like IP and slave where it is deployed.
Step 4] Joining your nodes
SSH to slave and execute following command to join the existing cluster.
$ kubeadm join –token <token> <master-ip>:<master-port>
You might also have an ca-cert-hash make sure you copy the entire join command from the init output to join the nodes.
Go to master node and see whether new slave has joined or not as-
-> If slave is not ready, wait for few seconds, new slave will join soon.
Step 5] Verify your cluster by running sample nginx application
$ vi sample_nginx.yaml
———————————————
apiVersion: apps/v1beta1
kind: Deployment
metadata:
name: nginx-deployment
spec:
replicas: 2 # tells deployment to run 2 pods matching the template
template: # create pods using pod definition in this template
metadata:
# unlike pod-nginx.yaml, the name is not included in the meta data as a unique name is
# generated from the deployment name
labels:
app: nginx
spec:
containers:
– name: nginx
image: nginx:1.7.9
ports:
– containerPort: 80
——————————————————
$ kubectl create -f sample_nginx.yaml
Verify pods are getting created or not.
$ kubectl get pods
$ kubectl get deployments
Now , lets expose the deployment so that the service will be accessible to other pods in the cluster.
$ kubectl expose deployment nginx-deployment –name=nginx-service –port=80 –target-port=80 –type=NodePort
Above command will create service with the name “nginx-service”. Service will be accessible on the port given by “–port” option for the “–target-port”. Target port will be of pod. Service will be accessible within the cluster only. In order to access it using your host IP “NodePort” option will be used.
–type=NodePort :- when this option is given k8s tries to find out one of free port in the range 30000-32767 on all the VMs of the cluster and binds the underlying service with it. If no such port found then it will return with an error.
Check service is created or not
$ kubectl get svc
Try to curl –
$ curl <service-IP> 80
From all the VMs including master. Nginx welcome page should be accessible.
$ curl <master-ip> nodePort
$ curl <slave-IP> nodePort
Execute this from all the VMs. Nginx welcome page should be accessible.
Also, Access nginx home page by using browser.
Helm: Installation and Configuration
PREREQUISITES
- You must have Kubernetes installed. We recommend version 1.4.1 or later.
- You should also have a local configured copy of
kubectl.
Helm will figure out where to install Tiller by reading your Kubernetes configuration file (usually $HOME/.kube/config). This is the same file that kubectl uses.
To find out which cluster Tiller would install to, you can run kubectl config current-contextor kubectl cluster-info.
$ kubectl config current-context
my-cluster
INSTALL HELM
Download a binary release of the Helm client. You can use tools like homebrew, or look at the official releases page.
For more details, or for other options, see the installation guide.
INITIALIZE HELM AND INSTALL TILLER
Once you have Helm ready, you can initialize the local CLI and also install Tiller into your Kubernetes cluster in one step:
$ helm init
This will install Tiller into the Kubernetes cluster you saw with kubectl config current-context.
TIP: Want to install into a different cluster? Use the --kube-context flag.
TIP: When you want to upgrade Tiller, just run helm init --upgrade.
INSTALL AN EXAMPLE CHART
To install a chart, you can run the helm install command. Helm has several ways to find and install a chart, but the easiest is to use one of the official stable charts.
$ helm repo update              # Make sure we get the latest list of charts
$ helm install stable/mysql
Released smiling-penguin
In the example above, the stable/mysql chart was released, and the name of our new release is smiling-penguin. You get a simple idea of the features of this MySQL chart by running helm inspect stable/mysql.
Whenever you install a chart, a new release is created. So one chart can be installed multiple times into the same cluster. And each can be independently managed and upgraded.
The helm install command is a very powerful command with many capabilities. To learn more about it, check out the Using Helm Guide
LEARN ABOUT RELEASES
It’s easy to see what has been released using Helm:
$ helm ls
NAME           	VERSION	 UPDATED                       	STATUS         	CHART
smiling-penguin	 1      	Wed Sep 28 12:59:46 2016      	DEPLOYED       	mysql-0.1.0
The helm list function will show you a list of all deployed releases.
UNINSTALL A RELEASE
To uninstall a release, use the helm delete command:
$ helm delete smiling-penguin
Removed smiling-penguin
This will uninstall smiling-penguin from Kubernetes, but you will still be able to request information about that release:
$ helm status smiling-penguin
Status: DELETED
...
Because Helm tracks your releases even after you’ve deleted them, you can audit a cluster’s history, and even undelete a release (with helm rollback).
READING THE HELP TEXT
To learn more about the available Helm commands, use helm help or type a command followed by the -h flag:
$ helm get -h
+++ aliases = [ “install.md”, “docs/install.md”, “using_helm/install.md”, “developing_charts/install.md” ] +++
Installing Helm
There are two parts to Helm: The Helm client (helm) and the Helm server (Tiller). This guide shows how to install the client, and then proceeds to show two ways to install the server.
INSTALLING THE HELM CLIENT
The Helm client can be installed either from source, or from pre-built binary releases.
From the Binary Releases
Every release of Helm provides binary releases for a variety of OSes. These binary versions can be manually downloaded and installed.
- Download your desired version
- Unpack it (
tar -zxvf helm-v2.0.0-linux-amd64.tgz) - Find the
helmbinary in the unpacked directory, and move it to its desired destination (mv linux-amd64/helm /usr/local/bin/helm)
From there, you should be able to run the client: helm help.
From Homebrew (macOS)
Members of the Kubernetes community have contributed a Helm formula build to Homebrew. This formula is generally up to date.
brew install kubernetes-helm
(Note: There is also a formula for emacs-helm, which is a different project.)
FROM SCRIPT
Helm now has an installer script that will automatically grab the latest version of the Helm client and install it locally.
You can fetch that script, and then execute it locally. It’s well documented so that you can read through it and understand what it is doing before you run it.
$ curl https://raw.githubusercontent.com/kubernetes/helm/master/scripts/get > get_helm.sh
$ chmod 700 get_helm.sh
$ ./get_helm.sh
Yes, you can curl https://raw.githubusercontent.com/kubernetes/helm/master/scripts/get | bash that if you want to live on the edge.
From Canary Builds
“Canary” builds are versions of the Helm software that are built from the latest master branch. They are not official releases, and may not be stable. However, they offer the opportunity to test the cutting edge features.
Canary Helm binaries are stored in the Kubernetes Helm GCS bucket. Here are links to the common builds:
From Source (Linux, macOS)
Building Helm from source is slightly more work, but is the best way to go if you want to test the latest (pre-release) Helm version.
You must have a working Go environment with glide and Mercurial installed.
$ cd $GOPATH
$ mkdir -p src/k8s.io
$ cd src/k8s.io
$ git clone https://github.com/kubernetes/helm.git
$ cd helm
$ make bootstrap build
The bootstrap target will attempt to install dependencies, rebuild the vendor/ tree, and validate configuration.
The build target will compile helm and place it in bin/helm. Tiller is also compiled, and is placed in bin/tiller.
INSTALLING TILLER
Tiller, the server portion of Helm, typically runs inside of your Kubernetes cluster. But for development, it can also be run locally, and configured to talk to a remote Kubernetes cluster.
Easy In-Cluster Installation
The easiest way to install tiller into the cluster is simply to run helm init. This will validate that helm’s local environment is set up correctly (and set it up if necessary). Then it will connect to whatever cluster kubectl connects to by default (kubectl config view). Once it connects, it will install tiller into the kube-system namespace.
After helm init, you should be able to run kubectl get pods --namespace kube-systemand see Tiller running.
You can explicitly tell helm init to…
- Install the canary build with the
--canary-imageflag - Install a particular image (version) with
--tiller-image - Install to a particular cluster with
--kube-context - Install into a particular namespace with
--tiller-namespace
Once Tiller is installed, running helm version should show you both the client and server version. (If it shows only the client version, helm cannot yet connect to the server. Use kubectl to see if any tiller pods are running.)
Helm will look for Tiller in the kube-system namespace unless --tiller-namespace or TILLER_NAMESPACE is set.
Installing Tiller Canary Builds
Canary images are built from the master branch. They may not be stable, but they offer you the chance to test out the latest features.
The easiest way to install a canary image is to use helm init with the --canary-image flag:
$ helm init --canary-image
This will use the most recently built container image. You can always uninstall Tiller by deleting the Tiller deployment from the kube-system namespace using kubectl.
Running Tiller Locally
For development, it is sometimes easier to work on Tiller locally, and configure it to connect to a remote Kubernetes cluster.
The process of building Tiller is explained above.
Once tiller has been built, simply start it:
$ bin/tiller
Tiller running on :44134
When Tiller is running locally, it will attempt to connect to the Kubernetes cluster that is configured by kubectl. (Run kubectl config view to see which cluster that is.)
You must tell helm to connect to this new local Tiller host instead of connecting to the one in-cluster. There are two ways to do this. The first is to specify the --host option on the command line. The second is to set the $HELM_HOST environment variable.
$ export HELM_HOST=localhost:44134
$ helm version # Should connect to localhost.
Client: &version.Version{SemVer:"v2.0.0-alpha.4", GitCommit:"db...", GitTreeState:"dirty"}
Server: &version.Version{SemVer:"v2.0.0-alpha.4", GitCommit:"a5...", GitTreeState:"dirty"}
Importantly, even when running locally, Tiller will store release configuration in ConfigMaps inside of Kubernetes.
UPGRADING TILLER
As of Helm 2.2.0, Tiller can be upgraded using helm init --upgrade.
For older versions of Helm, or for manual upgrades, you can use kubectl to modify the Tiller image:
$ export TILLER_TAG=v2.0.0-beta.1        # Or whatever version you want
$ kubectl --namespace=kube-system set image deployments/tiller-deploy tiller=gcr.io/kubernetes-helm/tiller:$TILLER_TAG
deployment "tiller-deploy" image updated
Setting TILLER_TAG=canary will get the latest snapshot of master.
DELETING OR REINSTALLING TILLER
Because Tiller stores its data in Kubernetes ConfigMaps, you can safely delete and re-install Tiller without worrying about losing any data. The recommended way of deleting Tiller is with kubectl delete deployment tiller-deploy --namespace kube-system, or more concisely helm reset.
Tiller can then be re-installed from the client with:
$ helm init
CONCLUSION
In most cases, installation is as simple as getting a pre-built helm binary and running helm init. This document covers additional cases for those who want to do more sophisticated things with Helm.
Once you have the Helm Client and Tiller successfully installed, you can move on to using Helm to manage charts.
+++ aliases = [ “kubernetes_distros.md”, “docs/kubernetes_distros.md”, “using_helm/kubernetes_distros.md”, “developing_charts/kubernetes_distros.md” ] +++
Kubernetes Distribution Guide
This document captures information about using Helm in specific Kubernetes environments.
We are trying to add more details to this document. Please contribute via Pull Requests if you can.
MINIKUBE
Helm is tested and known to work with minikube. It requires no additional configuration.
SCRIPTS/LOCAL-CLUSTER AND HYPERKUBE
Hyperkube configured via scripts/local-cluster.sh is known to work. For raw Hyperkube you may need to do some manual configuration.
GKE
Google’s GKE hosted Kubernetes platform is known to work with Helm, and requires no additional configuration.
UBUNTU WITH ‘KUBEADM’
Kubernetes bootstrapped with kubeadm is known to work on the following Linux distributions:
- Ubuntu 16.04
- CAN SOMEONE CONFIRM ON FEDORA?
Some versions of Helm (v2.0.0-beta2) require you to export KUBECONFIG=/etc/kubernetes/admin.conf or create a ~/.kube/config.
CONTAINER LINUX BY COREOS
Helm requires that kubelet have access to a copy of the socat program to proxy connections to the Tiller API. On Container Linux the Kubelet runs inside of a hyperkube container image that has socat. So, even though Container Linux doesn’t ship socat the container filesystem running kubelet does have socat. To learn more read the Kubelet Wrapper docs.
+++ aliases = [ “install_faq.md”, “docs/install_faq.md”, “using_helm/install_faq.md”, “developing_charts/install_faq.md” ] +++
Installation: Frequently Asked Questions
This section tracks some of the more frequently encountered issues with installing or getting started with Helm.
We’d love your help making this document better. To add, correct, or remove information, file an issue or send us a pull request.
DOWNLOADING
I want to know more about my downloading options.
Q: I can’t get to GitHub releases of the newest Helm. Where are they?
A: We no longer use GitHub releases. Binaries are now stored in a GCS public bucket.
Q: Why aren’t there Debian/Fedora/… native packages of Helm?
We’d love to provide these or point you toward a trusted provider. If you’re interested in helping, we’d love it. This is how the Homebrew formula was started.
Q: Why do you provide a curl ...|bash script?
A: There is a script in our repository (scripts/get) that can be executed as a curl ..|bashscript. The transfers are all protected by HTTPS, and the script does some auditing of the packages it fetches. However, the script has all the usual dangers of any shell script.
We provide it because it is useful, but we suggest that users carefully read the script first. What we’d really like, though, are better packaged releases of Helm.
INSTALLING
I’m trying to install Helm/Tiller, but something is not right.
Q: How do I put the Helm client files somewhere other than ~/.helm?
Set the $HELM_HOME environment variable, and then run helm init:
export HELM_HOME=/some/path
helm init --client-only
Note that if you have existing repositories, you will need to re-add them with helm repo add....
Q: How do I configure Helm, but not install Tiller?
A: By default, helm init will ensure that the local $HELM_HOME is configured, and then install Tiller on your cluster. To locally configure, but not install Tiller, use helm init --client-only.
Q: How do I manually install Tiller on the cluster?
A: Tiller is installed as a Kubernetes deployment. You can get the manifest by running helm init --dry-run --debug, and then manually install it with kubectl. It is suggested that you do not remove or change the labels on that deployment, as they are sometimes used by supporting scripts and tools.
Q: Why do I get Error response from daemon: target is unknown during Tiller install?
A: Users have reported being unable to install Tiller on Kubernetes instances that are using Docker 1.13.0. The root cause of this was a bug in Docker that made that one version incompatible with images pushed to the Docker registry by earlier versions of Docker.
This issue was fixed shortly after the release, and is available in Docker 1.13.1-RC1 and later.
GETTING STARTED
I successfully installed Helm/Tiller but I can’t use it.
Q: Trying to use Helm, I get the error “client transport was broken”
E1014 02:26:32.885226   16143 portforward.go:329] an error occurred forwarding 37008 -> 44134: error forwarding port 44134 to pod tiller-deploy-2117266891-e4lev_kube-system, uid : unable to do port forwarding: socat not found.
2016/10/14 02:26:32 transport: http2Client.notifyError got notified that the client transport was broken EOF.
Error: transport is closing
A: This is usually a good indication that Kubernetes is not set up to allow port forwarding.
Typically, the missing piece is socat. If you are running CoreOS, we have been told that it may have been misconfigured on installation. The CoreOS team recommends reading this:
Here are a few resolved issues that may help you get started:
Q: Trying to use Helm, I get the error “lookup XXXXX on 8.8.8.8:53: no such host”
Error: Error forwarding ports: error upgrading connection: dial tcp: lookup kube-4gb-lon1-02 on 8.8.8.8:53: no such host
A: We have seen this issue with Ubuntu and Kubeadm in multi-node clusters. The issue is that the nodes expect certain DNS records to be obtainable via global DNS. Until this is resolved upstream, you can work around the issue as follows:
1) Add entries to /etc/hosts on the master mapping your hostnames to their public IPs 2) Install dnsmasq on the master (e.g. apt install -y dnsmasq) 3) Kill the k8s api server container on master (kubelet will recreate it) 4) Then systemctl restart docker (or reboot the master) for it to pick up the /etc/resolv.conf changes
See this issue for more information: https://github.com/kubernetes/helm/issues/1455
Q: On GKE (Google Container Engine) I get “No SSH tunnels currently open”
Error: Error forwarding ports: error upgrading connection: No SSH tunnels currently open. Were the targets able to accept an ssh-key for user "gke-[redacted]"?
Another variation of the error message is:
Unable to connect to the server: x509: certificate signed by unknown authority
A: The issue is that your local Kubernetes config file must have the correct credentials.
When you create a cluster on GKE, it will give you credentials, including SSL certificates and certificate authorities. These need to be stored in a Kubernetes config file (Default: ~/.kube/config so that kubectl and helm can access them.
Q: When I run a Helm command, I get an error about the tunnel or proxy
A: Helm uses the Kubernetes proxy service to connect to the Tiller server. If the command kubectl proxy does not work for you, neither will Helm. Typically, the error is related to a missing socat service.
Q: Tiller crashes with a panic
When I run a command on Helm, Tiller crashes with an error like this:
Tiller is listening on :44134
Probes server is listening on :44135
Storage driver is ConfigMap
Cannot initialize Kubernetes connection: the server has asked for the client to provide credentials 2016-12-20 15:18:40.545739 I | storage.go:37: Getting release "bailing-chinchilla" (v1) from storage
panic: runtime error: invalid memory address or nil pointer dereference
[signal SIGSEGV: segmentation violation code=0x1 addr=0x0 pc=0x8053d5]

goroutine 77 [running]:
panic(0x1abbfc0, 0xc42000a040)
        /usr/local/go/src/runtime/panic.go:500 +0x1a1
k8s.io/helm/vendor/k8s.io/kubernetes/pkg/client/unversioned.(*ConfigMaps).Get(0xc4200c6200, 0xc420536100, 0x15, 0x1ca7431, 0x6, 0xc42016b6a0)
        /home/ubuntu/.go_workspace/src/k8s.io/helm/vendor/k8s.io/kubernetes/pkg/client/unversioned/configmap.go:58 +0x75
k8s.io/helm/pkg/storage/driver.(*ConfigMaps).Get(0xc4201d6190, 0xc420536100, 0x15, 0xc420536100, 0x15, 0xc4205360c0)
        /home/ubuntu/.go_workspace/src/k8s.io/helm/pkg/storage/driver/cfgmaps.go:69 +0x62
k8s.io/helm/pkg/storage.(*Storage).Get(0xc4201d61a0, 0xc4205360c0, 0x12, 0xc400000001, 0x12, 0x0, 0xc420200070)
        /home/ubuntu/.go_workspace/src/k8s.io/helm/pkg/storage/storage.go:38 +0x160
k8s.io/helm/pkg/tiller.(*ReleaseServer).uniqName(0xc42002a000, 0x0, 0x0, 0xc42016b800, 0xd66a13, 0xc42055a040, 0xc420558050, 0xc420122001)
        /home/ubuntu/.go_workspace/src/k8s.io/helm/pkg/tiller/release_server.go:577 +0xd7
k8s.io/helm/pkg/tiller.(*ReleaseServer).prepareRelease(0xc42002a000, 0xc42027c1e0, 0xc42002a001, 0xc42016bad0, 0xc42016ba08)
        /home/ubuntu/.go_workspace/src/k8s.io/helm/pkg/tiller/release_server.go:630 +0x71
k8s.io/helm/pkg/tiller.(*ReleaseServer).InstallRelease(0xc42002a000, 0x7f284c434068, 0xc420250c00, 0xc42027c1e0, 0x0, 0x31a9, 0x31a9)
        /home/ubuntu/.go_workspace/src/k8s.io/helm/pkg/tiller/release_server.go:604 +0x78
k8s.io/helm/pkg/proto/hapi/services._ReleaseService_InstallRelease_Handler(0x1c51f80, 0xc42002a000, 0x7f284c434068, 0xc420250c00, 0xc42027c190, 0x0, 0x0, 0x0, 0x0, 0x0)
        /home/ubuntu/.go_workspace/src/k8s.io/helm/pkg/proto/hapi/services/tiller.pb.go:747 +0x27d
k8s.io/helm/vendor/google.golang.org/grpc.(*Server).processUnaryRPC(0xc4202f3ea0, 0x28610a0, 0xc420078000, 0xc420264690, 0xc420166150, 0x288cbe8, 0xc420250bd0, 0x0, 0x0)
        /home/ubuntu/.go_workspace/src/k8s.io/helm/vendor/google.golang.org/grpc/server.go:608 +0xc50
k8s.io/helm/vendor/google.golang.org/grpc.(*Server).handleStream(0xc4202f3ea0, 0x28610a0, 0xc420078000, 0xc420264690, 0xc420250bd0)
        /home/ubuntu/.go_workspace/src/k8s.io/helm/vendor/google.golang.org/grpc/server.go:766 +0x6b0
k8s.io/helm/vendor/google.golang.org/grpc.(*Server).serveStreams.func1.1(0xc420124710, 0xc4202f3ea0, 0x28610a0, 0xc420078000, 0xc420264690)
        /home/ubuntu/.go_workspace/src/k8s.io/helm/vendor/google.golang.org/grpc/server.go:419 +0xab
created by k8s.io/helm/vendor/google.golang.org/grpc.(*Server).serveStreams.func1
        /home/ubuntu/.go_workspace/src/k8s.io/helm/vendor/google.golang.org/grpc/server.go:420 +0xa3
A: Check your security settings for Kubernetes.
A panic in Tiller is almost always the result of a failure to negotiate with the Kubernetes API server (at which point Tiller can no longer do anything useful, so it panics and exits).
Often, this is a result of authentication failing because the Pod in which Tiller is running does not have the right token.
To fix this, you will need to change your Kubernetes configuration. Make sure that --service-account-private-key-file from controller-manager and --service-account-key-filefrom apiserver point to the same x509 RSA key.
UPGRADING
My Helm used to work, then I upgrade. Now it is broken.
Q: After upgrade, I get the error “Client version is incompatible”. What’s wrong?
Tiller and Helm have to negotiate a common version to make sure that they can safely communicate without breaking API assumptions. That error means that the version difference is too great to safely continue. Typically, you need to upgrade Tiller manually for this.
The Installation Guide has definitive information about safely upgrading Helm and Tiller.
The rules for version numbers are as follows:
- Pre-release versions are incompatible with everything else.
Alpha.1is incompatible withAlpha.2. - Patch revisions are compatible: 1.2.3 is compatible with 1.2.4
- Minor revisions are not compatible: 1.2.0 is not compatible with 1.3.0, though we may relax this constraint in the future.
- Major revisions are not compatible: 1.0.0 is not compatible with 2.0.0.
UNINSTALLING
I am trying to remove stuff.
Q: When I delete the Tiller deployment, how come all the releases are still there?
Releases are stored in ConfigMaps inside of the kube-system namespace. You will have to manually delete them to get rid of the record.
Q: I want to delete my local Helm. Where are all its files?
Along with the helm binary, Helm stores some files in $HELM_HOME, which is located by default in ~/.helm.
+++ aliases = [ “using_helm.md”, “docs/using_helm.md”, “using_helm/using_helm.md”, “developing_charts/using_helm.md” ] +++
Using Helm
This guide explains the basics of using Helm (and Tiller) to manage packages on your Kubernetes cluster. It assumes that you have already installed the Helm client and the Tiller server (typically by helm init).
If you are simply interested in running a few quick commands, you may wish to begin with the Quickstart Guide. This chapter covers the particulars of Helm commands, and explains how to use Helm.
THREE BIG CONCEPTS
A Chart is a Helm package. It contains all of the resource definitions necessary to run an application, tool, or service inside of a Kubernetes cluster. Think of it like the Kubernetes equivalent of a Homebrew formula, an Apt dpkg, or a Yum RPM file.
A Repository is the place where charts can be collected and shared. It’s like Perl’s CPAN archive or the Fedora Package Database, but for Kubernetes packages.
A Release is an instance of a chart running in a Kubernetes cluster. One chart can often be installed many times into the same cluster. And each time it is installed, a new release is created. Consider a MySQL chart. If you want two databases running in your cluster, you can install that chart twice. Each one will have its own release, which will in turn have its own release name.
With these concepts in mind, we can now explain Helm like this:
Helm installs charts into Kubernetes, creating a new release for each installation. And to find new charts, you can search Helm chart repositories.
‘HELM SEARCH’: FINDING CHARTS
When you first install Helm, it is preconfigured to talk to the official Kubernetes charts repository. This repository contains a number of carefully curated and maintained charts. This chart repository is named stable by default.
You can see which charts are available by running helm search:
$ helm search
NAME                 	VERSION 	DESCRIPTION
stable/drupal   	0.3.2   	One of the most versatile open source content m...
stable/jenkins  	0.1.0   	A Jenkins Helm chart for Kubernetes.
stable/mariadb  	0.5.1   	Chart for MariaDB
stable/mysql    	0.1.0   	Chart for MySQL
...
With no filter, helm search shows you all of the available charts. You can narrow down your results by searching with a filter:
$ helm search mysql
NAME               	VERSION	DESCRIPTION
stable/mysql  	0.1.0  	Chart for MySQL
stable/mariadb	0.5.1  	Chart for MariaDB
Now you will only see the results that match your filter.
Why is mariadb in the list? Because its package description relates it to MySQL. We can use helm inspect chart to see this:
$ helm inspect stable/mariadb
Fetched stable/mariadb to mariadb-0.5.1.tgz
description: Chart for MariaDB
engine: gotpl
home: https://mariadb.org
keywords:
- mariadb
- mysql
- database
- sql
...
Search is a good way to find available packages. Once you have found a package you want to install, you can use helm install to install it.
‘HELM INSTALL’: INSTALLING A PACKAGE
To install a new package, use the helm install command. At its simplest, it takes only one argument: The name of the chart.
$ helm install stable/mariadb
Fetched stable/mariadb-0.3.0 to /Users/mattbutcher/Code/Go/src/k8s.io/helm/mariadb-0.3.0.tgz
happy-panda
Last Deployed: Wed Sep 28 12:32:28 2016
Namespace: default
Status: DEPLOYED

Resources:
==> extensions/Deployment
NAME                     DESIRED   CURRENT   UP-TO-DATE   AVAILABLE   AGE
happy-panda-mariadb   1         0         0            0           1s

==> v1/Secret
NAME                     TYPE      DATA      AGE
happy-panda-mariadb   Opaque    2         1s

==> v1/Service
NAME                     CLUSTER-IP   EXTERNAL-IP   PORT(S)    AGE
happy-panda-mariadb   10.0.0.70    <none>        3306/TCP   1s


Notes:
MariaDB can be accessed via port 3306 on the following DNS name from within your cluster:
happy-panda-mariadb.default.svc.cluster.local

To connect to your database run the following command:

   kubectl run happy-panda-mariadb-client --rm --tty -i --image bitnami/mariadb --command -- mysql -h happy-panda-mariadb
Now the mariadb chart is installed. Note that installing a chart creates a new release object. The release above is named happy-panda. (If you want to use your own release name, simply use the --name flag on helm install.)
During installation, the helm client will print useful information about which resources were created, what the state of the release is, and also whether there are additional configuration steps you can or should take.
Helm does not wait until all of the resources are running before it exits. Many charts require Docker images that are over 600M in size, and may take a long time to install into the cluster.
To keep track of a release’s state, or to re-read configuration information, you can use helm status:
$ helm status happy-panda
Last Deployed: Wed Sep 28 12:32:28 2016
Namespace: default
Status: DEPLOYED

Resources:
==> v1/Service
NAME                     CLUSTER-IP   EXTERNAL-IP   PORT(S)    AGE
happy-panda-mariadb   10.0.0.70    <none>        3306/TCP   4m

==> extensions/Deployment
NAME                     DESIRED   CURRENT   UP-TO-DATE   AVAILABLE   AGE
happy-panda-mariadb   1         1         1            1           4m

==> v1/Secret
NAME                     TYPE      DATA      AGE
happy-panda-mariadb   Opaque    2         4m


Notes:
MariaDB can be accessed via port 3306 on the following DNS name from within your cluster:
happy-panda-mariadb.default.svc.cluster.local

To connect to your database run the following command:

   kubectl run happy-panda-mariadb-client --rm --tty -i --image bitnami/mariadb --command -- mysql -h happy-panda-mariadb
The above shows the current state of your release.
Customizing the Chart Before Installing
Installing the way we have here will only use the default configuration options for this chart. Many times, you will want to customize the chart to use your preferred configuration.
To see what options are configurable on a chart, use helm inspect values:
helm inspect values stable/mariadb
Fetched stable/mariadb-0.3.0.tgz to /Users/mattbutcher/Code/Go/src/k8s.io/helm/mariadb-0.3.0.tgz
## Bitnami MariaDB image version
## ref: https://hub.docker.com/r/bitnami/mariadb/tags/
##
## Default: none
imageTag: 10.1.14-r3

## Specify a imagePullPolicy
## Default to 'Always' if imageTag is 'latest', else set to 'IfNotPresent'
## ref: http://kubernetes.io/docs/user-guide/images/#pre-pulling-images
##
# imagePullPolicy:

## Specify password for root user
## ref: https://github.com/bitnami/bitnami-docker-mariadb/blob/master/README.md#setting-the-root-password-on-first-run
##
# mariadbRootPassword:

## Create a database user
## ref: https://github.com/bitnami/bitnami-docker-mariadb/blob/master/README.md#creating-a-database-user-on-first-run
##
# mariadbUser:
# mariadbPassword:

## Create a database
## ref: https://github.com/bitnami/bitnami-docker-mariadb/blob/master/README.md#creating-a-database-on-first-run
##
# mariadbDatabase:
You can then override any of these settings in a YAML formatted file, and then pass that file during installation.
$ echo '{mariadbUser: user0, mariadbDatabase: user0db}' > config.yaml
$ helm install -f config.yaml stable/mariadb
The above will create a default MariaDB user with the name user0, and grant this user access to a newly created user0db database, but will accept all the rest of the defaults for that chart.
There are two ways to pass configuration data during install:
--values(or-f): Specify a YAML file with overrides. This can be specified multiple times and the rightmost file will take precedence--set: Specify overrides on the command line.
If both are used, --set values are merged into --values with higher precedence.
The Format and Limitations of --set
The --set option takes zero or more name/value pairs. At its simplest, it is used like this: --set name=value. The YAML equivalent of that is:
name: value
Multiple values are separated by , characters. So --set a=b,c=d becomes:
a: b
c: d
More complex expressions are supported. For example, --set outer.inner=value is translated into this:
outer:
  inner: value
Lists can be expressed by enclosing values in { and }. For example, --set name={a, b, c} translates to:
name:
  - a
  - b
  - c
As of Helm 2.5.0, it is possible to access list items using an array index syntax. For example, --set servers[0].port=80 becomes:
servers:
  - port: 80
Multiple values can be set this way. The line --set servers[0].port=80,servers[0].host=example becomes:
servers:
  - port: 80
    host: example
Sometimes you need to use special characters in your --set lines. You can use a backslash to escape the characters; --set name=value1,value2 will become:
name: "value1,value2"
Similarly, you can escape dot sequences as well, which may come in handy when charts use the toYaml function to parse annotations, labels and node selectors. The syntax for --set nodeSelector."kubernetes.io/role"=master becomes:
nodeSelector:
  kubernetes.io/role: master
Deeply nested data structures can be difficult to express using --set. Chart designers are encouraged to consider the --set usage when designing the format of a values.yaml file.
More Installation Methods
The helm install command can install from several sources:
- A chart repository (as we’ve seen above)
- A local chart archive (
helm install foo-0.1.1.tgz) - An unpacked chart directory (
helm install path/to/foo) - A full URL (
helm install https://example.com/charts/foo-1.2.3.tgz)
‘HELM UPGRADE’ AND ‘HELM ROLLBACK’: UPGRADING A RELEASE, AND RECOVERING ON FAILURE
When a new version of a chart is released, or when you want to change the configuration of your release, you can use the helm upgrade command.
An upgrade takes an existing release and upgrades it according to the information you provide. Because Kubernetes charts can be large and complex, Helm tries to perform the least invasive upgrade. It will only update things that have changed since the last release.
$ helm upgrade -f panda.yaml happy-panda stable/mariadb
Fetched stable/mariadb-0.3.0.tgz to /Users/mattbutcher/Code/Go/src/k8s.io/helm/mariadb-0.3.0.tgz
happy-panda has been upgraded. Happy Helming!
Last Deployed: Wed Sep 28 12:47:54 2016
Namespace: default
Status: DEPLOYED
...
In the above case, the happy-panda release is upgraded with the same chart, but with a new YAML file:
mariadbUser: user1
We can use helm get values to see whether that new setting took effect.
$ helm get values happy-panda
mariadbUser: user1
The helm get command is a useful tool for looking at a release in the cluster. And as we can see above, it shows that our new values from panda.yaml were deployed to the cluster.
Now, if something does not go as planned during a release, it is easy to roll back to a previous release using helm rollback [RELEASE] [REVISION].
$ helm rollback happy-panda 1
The above rolls back our happy-panda to its very first release version. A release version is an incremental revision. Every time an install, upgrade, or rollback happens, the revision number is incremented by 1. The first revision number is always 1. And we can use helm history [RELEASE] to see revision numbers for a certain release.
HELPFUL OPTIONS FOR INSTALL/UPGRADE/ROLLBACK
There are several other helpful options you can specify for customizing the behavior of Helm during an install/upgrade/rollback. Please note that this is not a full list of cli flags. To see a description of all flags, just run helm <command> --help.
--timeout: A value in seconds to wait for Kubernetes commands to complete This defaults to 300 (5 minutes)--wait: Waits until all Pods are in a ready state, PVCs are bound, Deployments have minimum (DesiredminusmaxUnavailable) Pods in ready state and Services have an IP address (and Ingress if aLoadBalancer) before marking the release as successful. It will wait for as long as the--timeoutvalue. If timeout is reached, the release will be marked asFAILED.
Note: In scenario where Deployment has replicas set to 1 and maxUnavailable is not set to 0 as part of rolling update strategy, --wait will return as ready as it has satisfied the minimum Pod in ready condition. – --no-hooks: This skips running hooks for the command – --recreate-pods (only available for upgrade and rollback): This flag will cause all pods to be recreated (with the exception of pods belonging to deployments)
‘HELM DELETE’: DELETING A RELEASE
When it is time to uninstall or delete a release from the cluster, use the helm deletecommand:
$ helm delete happy-panda
This will remove the release from the cluster. You can see all of your currently deployed releases with the helm list command:
$ helm list
NAME           	VERSION	UPDATED                        	STATUS         	CHART
inky-cat       	1      	Wed Sep 28 12:59:46 2016       	DEPLOYED       	alpine-0.1.0
From the output above, we can see that the happy-panda release was deleted.
However, Helm always keeps records of what releases happened. Need to see the deleted releases? helm list --deleted shows those, and helm list --all shows all of the releases (deleted and currently deployed, as well as releases that failed):
⇒  helm list --all
NAME           	VERSION	UPDATED                        	STATUS         	CHART
happy-panda   	2      	Wed Sep 28 12:47:54 2016       	DELETED        	mariadb-0.3.0
inky-cat       	1      	Wed Sep 28 12:59:46 2016       	DEPLOYED       	alpine-0.1.0
kindred-angelf 	2      	Tue Sep 27 16:16:10 2016       	DELETED        	alpine-0.1.0
Because Helm keeps records of deleted releases, a release name cannot be re-used. (If you really need to re-use a release name, you can use the --replace flag, but it will simply re-use the existing release and replace its resources.)
Note that because releases are preserved in this way, you can rollback a deleted resource, and have it re-activate.
‘HELM REPO’: WORKING WITH REPOSITORIES
So far, we’ve been installing charts only from the stable repository. But you can configure helm to use other repositories. Helm provides several repository tools under the helm repocommand.
You can see which repositories are configured using helm repo list:
$ helm repo list
NAME           	URL
stable         	https://kubernetes-charts.storage.googleapis.com
local          	http://localhost:8879/charts
mumoshu        	https://mumoshu.github.io/charts
And new repositories can be added with helm repo add:
$ helm repo add dev https://example.com/dev-charts
Because chart repositories change frequently, at any point you can make sure your Helm client is up to date by running helm repo update.
CREATING YOUR OWN CHARTS
The Chart Development Guide explains how to develop your own charts. But you can get started quickly by using the helm create command:
$ helm create deis-workflow
Creating deis-workflow
Now there is a chart in ./deis-workflow. You can edit it and create your own templates.
As you edit your chart, you can validate that it is well-formatted by running helm lint.
When it’s time to package the chart up for distribution, you can run the helm packagecommand:
$ helm package deis-workflow
deis-workflow-0.1.0.tgz
And that chart can now easily be installed by helm install:
$ helm install ./deis-workflow-0.1.0.tgz
...
Charts that are archived can be loaded into chart repositories. See the documentation for your chart repository server to learn how to upload.
Note: The stable repository is managed on the Kubernetes Charts GitHub repository. That project accepts chart source code, and (after audit) packages those for you.
TILLER, NAMESPACES AND RBAC
In some cases you may wish to scope Tiller or deploy multiple Tillers to a single cluster. Here are some best practices when operating in those circumstances.
- Tiller can be installed into any namespace. By default, it is installed into kube-system. You can run multiple Tillers provided they each run in their own namespace.
- Limiting Tiller to only be able to install into specific namespaces and/or resource types is controlled by Kubernetes RBAC roles and rolebindings. You can add a service account to Tiller when configuring Helm via
helm init --service-acount <NAME>. You can find more information about that here. - Release names are unique PER TILLER INSTANCE.
- Charts should only contain resources that exist in a single namespace.
- It is not recommended to have multiple Tillers configured to manage resources in the same namespace.
CONCLUSION
This chapter has covered the basic usage patterns of the helm client, including searching, installation, upgrading, and deleting. It has also covered useful utility commands like helm status, helm get, and helm repo.
For more information on these commands, take a look at Helm’s built-in help: helm help.
In the next chapter, we look at the process of developing charts.
+++ aliases = [ “plugins.md”, “docs/plugins.md”, “using_helm/plugins.md”, “developing_charts/plugins.md” ] +++
The Helm Plugins Guide
Helm 2.1.0 introduced the concept of a client-side Helm plugin. A plugin is a tool that can be accessed through the helm CLI, but which is not part of the built-in Helm codebase.
Existing plugins can be found on related section or by searching Github.
This guide explains how to use and create plugins.
AN OVERVIEW
Helm plugins are add-on tools that integrate seamlessly with Helm. They provide a way to extend the core feature set of Helm, but without requiring every new feature to be written in Go and added to the core tool.
Helm plugins have the following features:
- They can be added and removed from a Helm installation without impacting the core Helm tool.
- They can be written in any programming language.
- They integrate with Helm, and will show up in
helm helpand other places.
Helm plugins live in $(helm home)/plugins.
The Helm plugin model is partially modeled on Git’s plugin model. To that end, you may sometimes hear helm referred to as the porcelain layer, with plugins being the plumbing. This is a shorthand way of suggesting that Helm provides the user experience and top level processing logic, while the plugins do the “detail work” of performing a desired action.
INSTALLING A PLUGIN
A Helm plugin management system is in the works. But in the short term, plugins are installed by copying the plugin directory into $(helm home)/plugins.
$ cp -a myplugin/ $(helm home)/plugins/
If you have a plugin tar distribution, simply untar the plugin into the $(helm home)/pluginsdirectory.
BUILDING PLUGINS
In many ways, a plugin is similar to a chart. Each plugin has a top-level directory, and then a plugin.yaml file.
$(helm home)/plugins/
  |- keybase/
      |
      |- plugin.yaml
      |- keybase.sh
In the example above, the keybase plugin is contained inside of a directory named keybase. It has two files: plugin.yaml (required) and an executable script, keybase.sh (optional).
The core of a plugin is a simple YAML file named plugin.yaml. Here is a plugin YAML for a plugin that adds support for Keybase operations:
name: "keybase"
version: "0.1.0"
usage: "Integrate Keybase.io tools with Helm"
description: |-
  This plugin provides Keybase services to Helm.
ignoreFlags: false
useTunnel: false
command: "$HELM_PLUGIN_DIR/keybase.sh"
The name is the name of the plugin. When Helm executes it plugin, this is the name it will use (e.g. helm NAME will invoke this plugin).
name should match the directory name. In our example above, that means the plugin with name: keybase should be contained in a directory named keybase.
Restrictions on name:
namecannot duplicate one of the existinghelmtop-level commands.namemust be restricted to the characters ASCII a-z, A-Z, 0-9,_and-.
version is the SemVer 2 version of the plugin. usage and description are both used to generate the help text of a command.
The ignoreFlags switch tells Helm to not pass flags to the plugin. So if a plugin is called with helm myplugin --foo and ignoreFlags: true, then --foo is silently discarded.
The useTunnel switch indicates that the plugin needs a tunnel to Tiller. This should be set to true anytime a plugin talks to Tiller. It will cause Helm to open a tunnel, and then set $TILLER_HOST to the right local address for that tunnel. But don’t worry: if Helm detects that a tunnel is not necessary because Tiller is running locally, it will not create the tunnel.
Finally, and most importantly, command is the command that this plugin will execute when it is called. Environment variables are interpolated before the plugin is executed. The pattern above illustrates the preferred way to indicate where the plugin program lives.
There are some strategies for working with plugin commands:
- If a plugin includes an executable, the executable for a
command:should be packaged in the plugin directory. - The
command:line will have any environment variables expanded before execution.$HELM_PLUGIN_DIRwill point to the plugin directory. - The command itself is not executed in a shell. So you can’t oneline a shell script.
- Helm injects lots of configuration into environment variables. Take a look at the environment to see what information is available.
- Helm makes no assumptions about the language of the plugin. You can write it in whatever you prefer.
- Commands are responsible for implementing specific help text for
-hand--help. Helm will useusageanddescriptionforhelm helpandhelm help myplugin, but will not handlehelm myplugin --help.
ENVIRONMENT VARIABLES
When Helm executes a plugin, it passes the outer environment to the plugin, and also injects some additional environment variables.
Variables like KUBECONFIG are set for the plugin if they are set in the outer environment.
The following variables are guaranteed to be set:
HELM_PLUGIN: The path to the plugins directoryHELM_PLUGIN_NAME: The name of the plugin, as invoked byhelm. Sohelm myplugwill have the short namemyplug.HELM_PLUGIN_DIR: The directory that contains the plugin.HELM_BIN: The path to thehelmcommand (as executed by the user).HELM_HOME: The path to the Helm home.HELM_PATH_*: Paths to important Helm files and directories are stored in environment variables prefixed byHELM_PATH.TILLER_HOST: Thedomain:portto Tiller. If a tunnel is created, this will point to the local endpoint for the tunnel. Otherwise, it will point to$HELM_HOST,--host, or the default host (according to Helm’s rules of precedence).
While HELM_HOST may be set, there is no guarantee that it will point to the correct Tiller instance. This is done to allow plugin developer to access HELM_HOST in its raw state when the plugin itself needs to manually configure a connection.
A NOTE ON USETUNNEL
If a plugin specifies useTunnel: true, Helm will do the following (in order):
- Parse global flags and the environment
- Create the tunnel
- Set
TILLER_HOST - Execute the plugin
- Close the tunnel
The tunnel is removed as soon as the command returns. So, for example, a command cannot background a process and assume that that process will be able to use the tunnel.
A NOTE ON FLAG PARSING
When executing a plugin, Helm will parse global flags for its own use. Some of these flags are not passed on to the plugin.
--debug: If this is specified,$HELM_DEBUGis set to1--home: This is converted to$HELM_HOME--host: This is converted to$HELM_HOST--kube-context: This is simply dropped. If your plugin usesuseTunnel, this is used to set up the tunnel for you.
Plugins should display help text and then exit for -h and --help. In all other cases, plugins may use flags as appropriate.
Serverless Architectures: Monoliths, Nanoservices, Microservices & Hybrids
The Monolith
Whenever I hear “monolith”, I think of a massive LAMP project with a single, burning hot MySQL database.
.png)
(not always the case). The monolith architecture looks something like this in Serverless:

I.e. all requests to go to a single Lambda function, app.js. Users and games have nothing to do with one another but the application logic for users and games are in the same Lambda function.
Pros
We found that the greatest advantage that the monolith had over nanoservices and microservices was speed of deployment. With nanoservices and microservices, you have to deploy multiple copies of dependant node_modules (with Node.js) and any library code that your functions share which can be slow. With the monolith, it’s a single function deployment to all API endpoints so deployment is faster. On the other hand, how common is it to want to deploy all endpoints…
Cons
This architecture in Serverless, has similar drawbacks to the monolithic architecture in general:
- Tighter coupling. In the example above, app.js is responsible for both users and games. If a bug gets introduced into the users part of the function, it’s more likely that the games part might break too
- Complexity. If all application logic is in a single function, the function can get more complicated which can slow down development and make it easier to introduce bugs
Microservices
Microservices in Serverless looks something like this:
.png)
Pros
The advantages of the microservices architecture in Serverless inherits advantages of microservices in general. A couple:
- Separation of concerns. If a bug has been introduced into games.js, calls to users.js should carry on working. Of course, maybe GET /users/:id might contact the games microservice to get games that the user plays but if users.js and games.js are proper microservices then users.js should handle games.js failing and vice versa
- Less complexity. Adding additional functionality to games.js doesn’t make the users.js codebase any more complicated
Cons
As mentioned above with the monolith, microservices in Serverless can result in slower deployments.
Nanoservices
Nanoservices take microservices to the extreme – one function per endpoint instead of one per resource:
.png)
Pros
Nanoservices take the advantages of microservices and amplifies them. Separation of concerns is greater – get_users.js is probably going to be simpler than users.js that handles everything to do with a user.
Cons
Again, similar to microservices but even more so – the number of functions to deploy can get huge so deployment time can increase.
Hybrid
There is nothing to stop Developers taking a hybrid approach to their architecture e.g. a mixture of nanoservices and microservices. In our example, if there was a lot of game functionality, it might make sense to split the functionality into nanoservices but if is less functionality related to users, microservices could be more appropriate:
.png)
If you have any examples of how you’re architecting your Serverless projects, tell us about it!
Docker – Ubuntu – bash: ping: command not found
Docker images are pretty minimal, But you can install ping in your official ubuntu docker image via:
apt-get update
apt-get install iputils-ping
Chances are you dont need ping your image, and just want to use it for testing purposes. Above example will help you out.
But if you need ping to exist on your image, you can create a Dockerfile or commit the container you ran the above commands in to a new image.
Commit:
docker commit -m "Installed iputils-ping" --author "Your Name <name@domain.com>" ContainerNameOrId yourrepository/imagename:tag
Dockerfile:
FROM ubuntu
RUN apt-get update && apt-get install -y iputils-ping
CMD bashKubernetes Issues
- The pods in kubernetes are in pending state when we execute kubectl get pods
Execute the following command to see the root cause:
kubectl get events
You will see output as follows:
LAST SEEN FIRST SEEN COUNT NAME KIND SUBOBJECT TYPE REASON SOURCE MESSAG E
1m 14h 3060 hello-nginx-5d47cdc4b7-8btwf.14ecd67c4676131c Pod Warning FailedScheduling default-scheduler No nod es are available that match all of the predicates: PodToleratesNodeTaints (1).This error usually comes when we try to create pod on the master node:
Execute the following command:kubectl taint nodes <nodeName> node-role.kubernetes.io/master:NoSchedule- - helm install stable/mysql: Error: no available release name found
Execute the helm ls command to get the root cause:
The error I received is
Error: configmaps is forbidden: User “system:serviceaccount:kube-system:default” cannot list configmaps in the namespace “kube-system”
The default serviceaccount does not have API permissions. Helm likely needs to be assigned a service account, and that service account given API permissions.
The commands used to solve are:kubectl create serviceaccount --namespace kube-system tiller kubectl create clusterrolebinding tiller-cluster-rule --clusterrole=cluster-admin --serviceaccount=kube-system:tiller kubectl patch deploy --namespace kube-system tiller-deploy -p '{"spec":{"template":{"spec":{"serviceAccount":"tiller"}}}}' helm init --service-account tiller --upgradeAfter that if you get the following error: Error: forwarding ports: error upgrading connection: unable to upgrade connection: pod not found (“tiller-deploy-cffb976df-m5z6f_kube-system”)
Then execute helm init –upgrade - kubernetes pods keep crashing with “CrashLoopBackOff” but I can’t find any logI had the need to keep a pod running for subsequent kubectl exec calls and as the comments above pointed out my pod was getting killed by my k8s cluster because it had completed running all its tasks. I managed to keep my pod running by simply kicking the pod with a command that would not stop automatically as in:
kubectl run YOUR_POD_NAME -n YOUR_NAMESPACE --image SOME_PUBLIC_IMAGE:latest --command tailf /dev/null - Create busybox kubernetes pod
kubectl run -i –tty busybox –image=busybox –restart=Never — sh - Kubernetes pods cannot connect to internet kubeadm:
If your pods cannot connect to the internet, you caan check the following:
Spin up a busybox
Execute: ping 8.8.8.8
ping google.com
route -n You will get an ip for gateway. Check if you can ping the gateway
In the kubernetes master node check the ip of kube-dns pod with command:
kubectl get pods -n kube-system -o wide | grep kube-dns this will return an IP in output. In your pod container check if this IP is present as nameserver.
ifconfig note the IP address range assigned to the container.
In the kubernetes master node execute ifconfig check that the IP address noted previously belong to which bridge’s IP range.
If it belongs to some other interface than expected you can check it by executing:
brctl show check if the bridge has an interface attached to it.
If not this is the reason the pods do not have an internet connection.
You can attach the interface with this command:
brctl addif mybridge eth0
This issue can be in the weave network, try to do a kubeadm reset and add a flannel network
Install kubernetes on Centos/RHEL 7
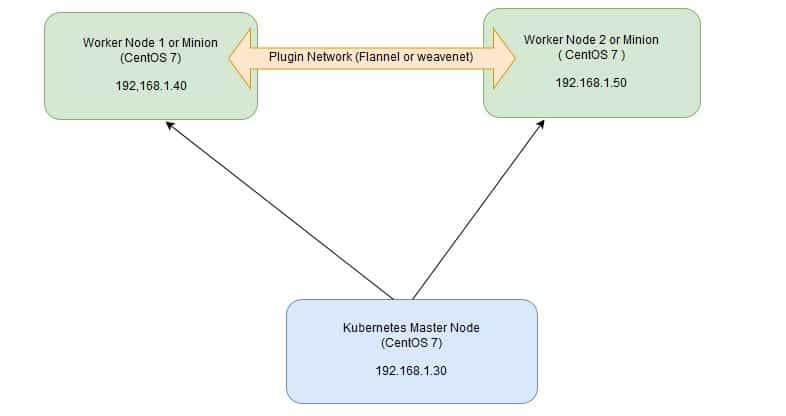
Kubernetes is a cluster and orchestration engine for docker containers. In other words Kubernetes is an open source software or tool which is used to orchestrate and manage docker containers in cluster environment. Kubernetes is also known as k8s and it was developed by Google and donated to “Cloud Native Computing foundation”
In Kubernetes setup we have one master node and multiple nodes. Cluster nodes is known as worker node or Minion. From the master node we manage the cluster and its nodes using ‘kubeadm‘ and ‘kubectl‘ command.
Kubernetes can be installed and deployed using following methods:
- Minikube ( It is a single node kubernetes cluster)
- Kops ( Multi node kubernetes setup into AWS )
- Kubeadm ( Multi Node Cluster in our own premises)
In this article we will install latest version of Kubernetes 1.7 on CentOS 7 / RHEL 7 with kubeadm utility. In my setup I am taking three CentOS 7 servers with minimal installation. One server will acts master node and rest two servers will be minion or worker nodes.
On the Master Node following components will be installed
- API Server – It provides kubernetes API using Jason / Yaml over http, states of API objects are stored in etcd
- Scheduler – It is a program on master node which performs the scheduling tasks like launching containers in worker nodes based on resource availability
- Controller Manager – Main Job of Controller manager is to monitor replication controllers and create pods to maintain desired state.
- etcd – It is a Key value pair data base. It stores configuration data of cluster and cluster state.
- Kubectl utility – It is a command line utility which connects to API Server on port 6443. It is used by administrators to create pods, services etc.
On Worker Nodes following components will be installed
- Kubelet – It is an agent which runs on every worker node, it connects to docker and takes care of creating, starting, deleting containers.
- Kube-Proxy – It routes the traffic to appropriate containers based on ip address and port number of the incoming request. In other words we can say it is used for port translation.
- Pod – Pod can be defined as a multi-tier or group of containers that are deployed on a single worker node or docker host.
Installations Steps of Kubernetes 1.7 on CentOS 7 / RHEL 7
Perform the following steps on Master Node
Step 1: Disable SELinux & setup firewall rules
Login to your kubernetes master node and set the hostname and disable selinux using following commands
~]# hostnamectl set-hostname 'k8s-master'
~]# exec bash
~]# setenforce 0
~]# sed -i 's/SELINUX=enforcing/SELINUX=disabled/g' /etc/sysconfig/selinux
Set the following firewall rules.
[root@k8s-master ~]# firewall-cmd --permanent --add-port=6443/tcp
[root@k8s-master ~]# firewall-cmd --permanent --add-port=2379-2380/tcp
[root@k8s-master ~]# firewall-cmd --permanent --add-port=10250/tcp
[root@k8s-master ~]# firewall-cmd --permanent --add-port=10251/tcp
[root@k8s-master ~]# firewall-cmd --permanent --add-port=10252/tcp
[root@k8s-master ~]# firewall-cmd --permanent --add-port=10255/tcp
[root@k8s-master ~]# firewall-cmd --reload
[root@k8s-master ~]# echo '1' > /proc/sys/net/bridge/bridge-nf-call-iptables
Note: In case you don’t have your own dns server then update /etc/hosts file on master and worker nodes
192.168.1.30 k8s-master
192.168.1.40 worker-node1
192.168.1.50 worker-node2
Step 2: Configure Kubernetes Repository
Kubernetes packages are not available in the default CentOS 7 & RHEL 7 repositories, Use below command to configure its package repositories.
[root@k8s-master ~]# cat <<EOF > /etc/yum.repos.d/kubernetes.repo
> [kubernetes]
> name=Kubernetes
> baseurl=https://packages.cloud.google.com/yum/repos/kubernetes-el7-x86_64
> enabled=1
> gpgcheck=1
> repo_gpgcheck=1
> gpgkey=https://packages.cloud.google.com/yum/doc/yum-key.gpg
>         https://packages.cloud.google.com/yum/doc/rpm-package-key.gpg
> EOF [root@k8s-master ~]#
Step 3: Install Kubeadm and Docker
Once the package repositories are configured, run the beneath command to install kubeadm and docker packages.
[root@k8s-master ~]# yum install kubeadm docker -y
Start and enable kubectl and docker service
[root@k8s-master ~]# systemctl restart docker && systemctl enable docker
[root@k8s-master ~]# systemctl  restart kubelet && systemctl enable kubelet
Step 4: Initialize Kubernetes Master with ‘kubeadm init’
Run the beneath command to initialize and setup kubernetes master.
[root@k8s-master ~]# kubeadm init
Output of above command would be something like below
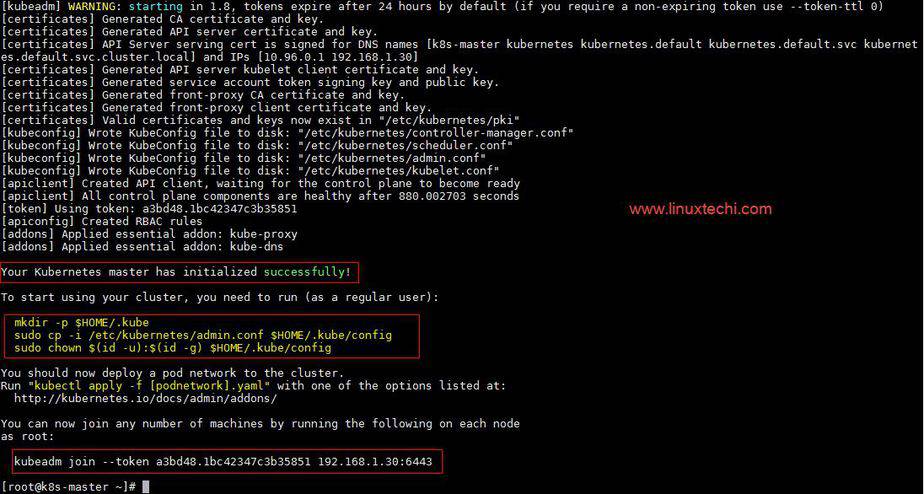
As we can see in the output that kubernetes master has been initialized successfully. Execute the beneath commands to use the cluster as root user.
[root@k8s-master ~]# mkdir -p $HOME/.kube
[root@k8s-master ~]# cp -i /etc/kubernetes/admin.conf $HOME/.kube/config
[root@k8s-master ~]# chown $(id -u):$(id -g) $HOME/.kube/config
Step 5: Deploy pod network to the cluster
Try to run below commands to get status of cluster and pods.
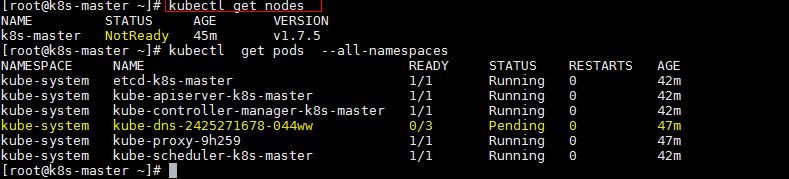
To make the cluster status ready and kube-dns status running, deploy the pod network so that containers of different host communicated each other. POD network is the overlay network between the worker nodes.
Run the beneath command to deploy network.
[root@k8s-master ~]# export kubever=$(kubectl version | base64 | tr -d 'n')
[root@k8s-master ~]# kubectl apply -f "https://cloud.weave.works/k8s/net?k8s-version=$kubever"
serviceaccount "weave-net" created
clusterrole "weave-net" created
clusterrolebinding "weave-net" created
daemonset "weave-net" created
[root@k8s-master ~]#
Now run the following commands to verify the status
[root@k8s-master ~]# kubectl get nodes
NAME         STATUS    AGE       VERSION
k8s-master   Ready     1h        v1.7.5
[root@k8s-master ~]# kubectl  get pods  --all-namespaces
NAMESPACE     NAME                                 READY     STATUS    RESTARTS   AGE
kube-system   etcd-k8s-master                      1/1       Running   0          57m
kube-system   kube-apiserver-k8s-master            1/1       Running   0          57m
kube-system   kube-controller-manager-k8s-master   1/1       Running   0          57m
kube-system   kube-dns-2425271678-044ww            3/3       Running   0          1h
kube-system   kube-proxy-9h259                     1/1       Running   0          1h
kube-system   kube-scheduler-k8s-master            1/1       Running   0          57m
kube-system   weave-net-hdjzd                      2/2       Running   0          7m
[root@k8s-master ~]#
Now let’s add worker nodes to the Kubernetes master nodes.
Perform the following steps on each worker node
Step 1: Disable SELinux & configure firewall rules on both the nodes
Before disabling SELinux set the hostname on the both nodes as ‘worker-node1’ and ‘worker-node2’ respectively
~]# setenforce 0
~]# sed -i 's/SELINUX=enforcing/SELINUX=disabled/g' /etc/sysconfig/selinux
~]# firewall-cmd --permanent --add-port=10250/tcp
~]# firewall-cmd --permanent --add-port=10255/tcp
~]# firewall-cmd --permanent --add-port=30000-32767/tcp
~]# firewall-cmd --permanent --add-port=6783/tcp
~]# firewall-cmd  --reload
~]# echo '1' > /proc/sys/net/bridge/bridge-nf-call-iptables
Step 2: Configure Kubernetes Repositories on both worker nodes
~]# cat <<EOF > /etc/yum.repos.d/kubernetes.repo
> [kubernetes]
> name=Kubernetes
> baseurl=https://packages.cloud.google.com/yum/repos/kubernetes-el7-x86_64
> enabled=1
> gpgcheck=1
> repo_gpgcheck=1
> gpgkey=https://packages.cloud.google.com/yum/doc/yum-key.gpg
>         https://packages.cloud.google.com/yum/doc/rpm-package-key.gpg
> EOF
Step 3: Install kubeadm and docker package on both nodes
[root@worker-node1 ~]# yum  install kubeadm docker -y
[root@worker-node2 ~]# yum  install kubeadm docker -y
Start and enable docker service
[root@worker-node1 ~]# systemctl restart docker && systemctl enable docker
[root@worker-node2 ~]# systemctl restart docker && systemctl enable docker
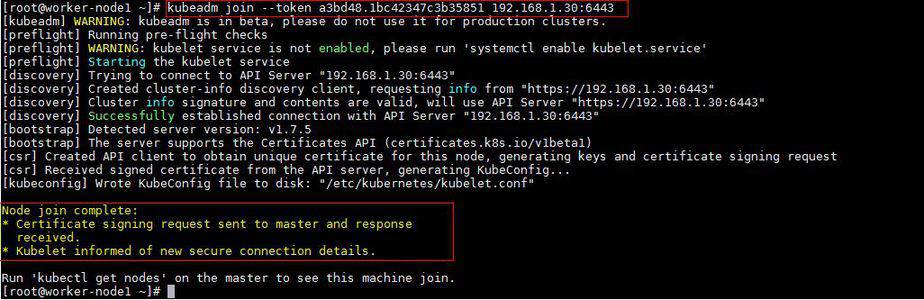
Step 4: Now Join worker nodes to master node
To join worker nodes to Master node, a token is required. Whenever kubernetes master initialized , then in the output we get command and token. Copy that command and run on both nodes.
[root@worker-node1 ~]# kubeadm join --token a3bd48.1bc42347c3b35851 192.168.1.30:6443
Output of above command would be something like below
[root@worker-node2 ~]# kubeadm join --token a3bd48.1bc42347c3b35851 192.168.1.30:6443
Output would be something like below
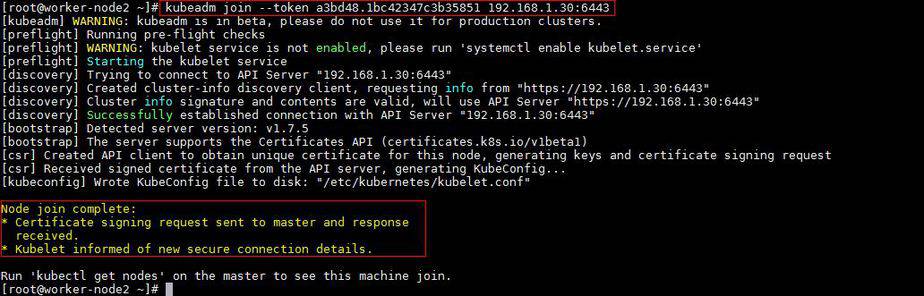
Now verify Nodes status from master node using kubectl command
[root@k8s-master ~]# kubectl get nodes
NAME           STATUS    AGE       VERSION
k8s-master     Ready     2h        v1.7.5
worker-node1   Ready     20m       v1.7.5
worker-node2   Ready     18m       v1.7.5
[root@k8s-master ~]#
As we can see master and worker nodes are in ready status. This concludes that kubernetes 1.7 has been installed successfully and also we have successfully joined two worker nodes. Now we can create pods and services.
Installing Kubernetes on your Windows with Minikube
Personally I think if you are looking for a container management solution in today’s world, you have to invest your time in Kubernetes (k8s). There is no doubt about that because of multiple factors. To the best of my undestanding, these points include:
- Kubernetes is Open Source
- Great momentum in terms of activities & contribution at its Open Source Project
- Decades of experience running its predecessor at Google
- Support of multiple OS and infrastructure software vendors
- Rate at which features are being released
- Production readiness (Damn it, Pokemon Go met its scale due to Kubernetes)
- Number of features available. Check out the list of features at the home page.
The general perception about a management solution like Kubernetes is that it would require quite a bit of setup for you to try it out locally. What this means is that it would take some time to set it up but more than setting it up, you might probably get access to it only during staging phase or something like that. Ideally you want a similar environment in your development too, so that you are as close to what it takes to run your application. The implications of this is that you want it running on your laptop/desktop, where you are likely to do your development.
This was the goal behind the minikube project and the team has put in fantastic effort to help us setup and run Kubernetes on our development machines. This is as simple and portable as it can get. The tagline of minikube project says it all: “Run Kubernetes locally”.

Side Note: The design of the minikube logo makes for interesting reading.
This post is going to take you through setting up Minikube on your Windows development machine and then taking it for a Hello World spin to see a local Kubernetes cluster in action. Along the way, I will highlight my environment and what I had to do to get the experimental build of minikube working on my Windows machine. Yes, it is experimental software, but it works!
If you are not on Windows, the instructions to setup minikube on either your Linux machine or Mac machine are also available here. Check it out. You can then safely skip over the setup and go to the section where we do a quick Hello World to test drive Kubernetes locally.
Keep in mind that Minikube gives you a single node cluster that is running in a VM on your development machine.
Of course, once you are done with what you see in this blog, I strongly recommend that you also look at Managed Container Orchestration solutions like Google Container Engine.
Let’s get started now with installation of minikube. But first, we must make sure that our development machine has some of the pre-requisites required to run it. Do not ignore that!
Using VirtualBox and not Hyper-V
VirtualBox and Hyperv (which is available on Windows 10) do not make a happy pair and you are bound to run into situations where the tools get confused. I preferred to use VirtualBox and avoid all esoteric command-line switches that we need to provide to enable creation of the underlying Docker hosts, etc.
To disable Hyper-V, go to Turn Windows features on or off and you will see a dialog with list of Windows features as shown below. Navigate to the Hyper-V section and disable it completely.
This will require a restart to the machine to take effect and on my machine, it even ended up doing a Windows Update, configuring it and a good 10 minutes later, it was back up.

Great! We have everything now to get going.
Development Machine Environment
I am assuming that you have a setup that is similar to this. I believe, you should be fine on Windows 7 too and it would not have the HyperV stuff, instructions of which I will give in a while.
- Windows 10 Laptop. VT-x/AMD-v virtualization must be enabled in BIOS.
- Docker Toolbox v1.12.0. The toolbox sets up VirtualBox and I have gone with that.
- kubectl command line utility. This is the CLI utility for the Kubernetes cluster and you need to install it and have it available in your PATH. To install the latest 1.4 release, do the following: Go to the browser and give the following URL : http://storage.googleapis.com/kubernetes-release/release/v1.8.1/bin/windows/amd64/kubectl.exe. This will download the kubectl CLI executable. Please make it available in the environment PATH variable.
Note: kubectl versions are available at a generic location as per the following format: https://storage.googleapis.com/kubernetes-release/release/${K8S_VERSION}/bin/${GOOS}/${GOARCH}/${K8S_BINARY}
To find the latest kubectl version goto this link: https://storage.googleapis.com/kubernetes-release/release/stable.txt
Minikube installation
The first step is to take the kubectl.exe file that you downloaded in the previous step and place that in the C: folder.
The next step is to download the minikube binary from the following location: https://github.com/kubernetes/minikube/releases
Go to the Windows download link as shown below:

This will start downloading the v0.22.3 release of the executable. The file name is minikube-windows-amd64.exe. Just rename this to minikube.exeand place it in C: drive, alongside the kubectl.exe file from the previous section.
You are all set now to launch a local Kubernetes one-node cluster!
All the steps moving forward are being done in Powershell. Launch Powershell in Administrative mode (Ctrl-Shift-Enter) and navigate to C: drive where the kubectl.exe and minikube.exe files are present.

A few things to note
Let’s do our standard testing to validate our utilities.

If you go to your %HOMEPATH%.minikube folder now, you will notice that several folders got created. Take a look!
There are multiple commands that Minikube supports. You can use the standard ` — help` option to see the list of commands that it has:
PS C:> .minikube --help
Minikube is a CLI tool that provisions and manages single-node Kubernetes clusters optimized for development workflows
Usage:
  minikube [command]
Available Commands:
  dashboard        Opens/displays the kubernetes dashboard URL for your local cluster
  delete           Deletes a local kubernetes cluster.
  docker-env       sets up docker env variables; similar to '$(docker-machine env)'
  get-k8s-versions Gets the list of available kubernetes versions available for minikube.
  ip               Retrieve the IP address of the running cluster.
  logs             Gets the logs of the running localkube instance, used for debugging minikube, not user code.
  config           Modify minikube config
  service          Gets the kubernetes URL for the specified service in your local cluster
  ssh              Log into or run a command on a machine with SSH; similar to 'docker-machine ssh'
  start            Starts a local kubernetes cluster.
  status           Gets the status of a local kubernetes cluster.
  stop             Stops a running local kubernetes cluster.
  version          Print the version of minikube.
Flags:
      --alsologtostderr[=false]: log to standard error as well as files
      --log-flush-frequency=5s: Maximum number of seconds between log flushes
      --log_backtrace_at=:0: when logging hits line file:N, emit a stack trace
      --log_dir="": If non-empty, write log files in this directory
      --logtostderr[=false]: log to standard error instead of files
      --show-libmachine-logs[=false]: Whether or not to show logs from libmachine.
      --stderrthreshold=2: logs at or above this threshold go to stderr
      --v=0: log level for V logs
      --vmodule=: comma-separated list of pattern=N settings for file-filtered logging
Use "minikube [command] --help" for more information about a command.
I have highlighted a couple of Global flags that you can use in all the commands for minikube. These flags are useful to see what is going on inside the hood at times and also for seeing the output on the standard output (console/command).
Minikube supports multiple versions of Kubernetes and the latest version is v1.7.5. To check out the different versions supported try out the following command:
PS C:> .minikube get-k8s-versions
The following Kubernetes versions are available:
 - v1.7.5
 - v1.7.4
 - v1.7.3
 - v1.7.2
 - v1.7.0
 - v1.7.0-rc.1
 - v1.7.0-alpha.2
 - v1.6.4
 - v1.6.3
 - v1.6.0
 - v1.6.0-rc.1
 - v1.6.0-beta.4
 - v1.6.0-beta.3
 - v1.6.0-beta.2
 - v1.6.0-alpha.1
 - v1.6.0-alpha.0
 - v1.5.3
 - v1.5.2
 - v1.5.1
 - v1.4.5
 - v1.4.3
 - v1.4.2
 - v1.4.1
 - v1.4.0
 - v1.3.7
 - v1.3.6
 - v1.3.5
 - v1.3.4
 - v1.3.3
 - v1.3.0
Starting our Cluster
We are now ready to launch our Kubernetes cluster locally. We will use the start command for it.
Note: You might run into multiple issues while starting a cluster the first time. I have several of them and have created a section at the end of this blog post on Troubleshooting. Take a look at it, in case you run into any issues.
You can check out the help and description of the command/flags/options via the help option as shown below:
PS C:> .minikube.exe start --help
You will notice several Flags that you can provide to the start command and while there are some useful defaults, we are going to be a bit specific, so that we can better understand things.
We want to use Kubernetes v1.7.5 and while the VirtualBox driver is default on windows, we are going to be explicit about it. At the same time, we are going to use a couple of the Global Flags that we highlighted earlier, so that we can see what is going on under the hood.
All we need to do is give the following command (I have separated the flags on separate line for better readability). The output is also attached.
PS C:> .minikube.exe start --kubernetes-version="v1.7.5"
                             --vm-driver="virtualbox"
                             --alsologtostderr
W1004 13:01:30.429310    9296 root.go:127] Error reading config file at C:Usersirani_r.minikubeconfigconfig.json: o
pen C:Usersirani_r.minikubeconfigconfig.json: The system cannot find the file specified.
I1004 13:01:30.460582    9296 notify.go:103] Checking for updates...
Starting local Kubernetes cluster...
Creating CA: C:Usersirani_r.minikubecertsca.pem
Creating client certificate: C:Usersirani_r.minikubecertscert.pemRunning pre-create checks...
Creating machine...
(minikube) Downloading C:Usersirani_r.minikubecacheboot2docker.iso from file://C:/Users/irani_r/.minikube/cache/iso
/minikube-0.7.iso...
(minikube) Creating VirtualBox VM...
(minikube) Creating SSH key...
(minikube) Starting the VM...
(minikube) Check network to re-create if needed...
(minikube) Waiting for an IP...
Waiting for machine to be running, this may take a few minutes...
Detecting operating system of created instance...
Waiting for SSH to be available...
Detecting the provisioner...
Provisioning with boot2docker...
Copying certs to the local machine directory...
Copying certs to the remote machine...
Setting Docker configuration on the remote daemon...
Checking connection to Docker...
Docker is up and running!
I1004 13:03:06.480550    9296 cluster.go:389] Setting up certificates for IP: %s 192.168.99.100
I1004 13:03:06.567686    9296 cluster.go:202] sudo killall localkube || true
I1004 13:03:06.611680    9296 cluster.go:204] killall: localkube: no process killed
I1004 13:03:06.611680    9296 cluster.go:202]
# Run with nohup so it stays up. Redirect logs to useful places.
sudo sh -c 'PATH=/usr/local/sbin:$PATH nohup /usr/local/bin/localkube   --generate-certs=false --logtostderr=true --node
-ip=192.168.99.100 > /var/lib/localkube/localkube.err 2> /var/lib/localkube/localkube.out < /dev/null & echo $! > /var/r
un/localkube.pid &'
I1004 13:03:06.658605    9296 cluster.go:204]
Kubectl is now configured to use the cluster.
PS C:>
Let us understand what it is doing behind the scenes in brief. I have also highlighted some of the key lines in the output above:
- It generates the certificates and then proceeds to provision a local Docker host. This will result in a VM created inside of VirtualBox.
- That host is provisioned with the boot2Docker ISO image.
- It does its magic of setting it up, assigning it an IP and all the works.
- Finally, it prints out a message that kubectl is configured to talk to your local Kubernetes cluster.
You can now check on the status of the local cluster via the status command:
PS C:> .minikube.exe status
minikubeVM: Running
localkube: Running
You can also use the kubectl CLI to get the cluster information:
PS C:> .kubectl.exe cluster-info
Kubernetes master is running at https://192.168.99.100:8443
kubernetes-dashboard is running at https://192.168.99.100:8443/api/v1/proxy/namespaces/kube-system/services/kubernetes-d
ashboard
To further debug and diagnose cluster problems, use 'kubectl cluster-info dump'.
Kubernetes Client and Server version
Let us do a quick check of the Kubernetes version at the client and server level. Execute the following command:
PS C:> .kubectl version
Client Version: version.Info{Major:"1", Minor:"4", GitVersion:"v1.7.5", GitCommit:"a16c0a7f71a6f93c7e0f222d961f4675cd97a
46b", GitTreeState:"clean", BuildDate:"2016-09-26T18:16:57Z", GoVersion:"go1.6.3", Compiler:"gc", Platform:"windows/amd6
4"}
Server Version: version.Info{Major:"1", Minor:"4", GitVersion:"v1.7.5", GitCommit:"a16c0a7f71a6f93c7e0f222d961f4675cd97a
46b", GitTreeState:"dirty", BuildDate:"1970-01-01T00:00:00Z", GoVersion:"go1.7.1", Compiler:"gc", Platform:"linux/amd64"
}
You will notice that both client and server are at version 1.4.
Cluster IP Address
You can get the IP address of the cluster via the ip command:
PS C:> .minikube.exe ip
192.168.99.100
Kubernetes Dashboard
You can launch the Kubernetes Dashboard at any point via the dashboardcommand as shown below:
PS C:> .minikube.exe dashboard
This will automatically launch the Dashboard in your local browser. However if you just want to nab the Dashboard URL, you can use the following flag:
PS C:> .minikube.exe dashboard --url=true
http://192.168.99.100:30000
There is a great post on how the Kubernetes Dashboard underwent a design change in version 1.4. It explains how the information is split up into respective sections i.e. Workloads , Services and Discovery, Storage and Configuration, which are present on the left-side menu and via which you can sequentially introspect more details of your cluster. All of this is provided by a nifty filter for the Namespace value above.
If you look at the Kubernetes dashboard right now, you will see that it indicates that nothing has been deployed. Let us step back and think what we have so far. We have launched a single-node cluster .. right? Click on the Node link and you will see that information:

The above node information can also be obtained by using the kubectl CLI to get the list of nodes.
PS C:> .kubectl.exe get nodes
NAME       STATUS    AGE
minikube   Ready     51m
Hopefully, you are now able to relate how some of the CLI calls are reflected in the Dashboard too. Let’s move forward. But before that, one important tip!
Tip: use-context minikube
If you had noticed closely when we started the cluster, there is a statement in the output that says “Kubectl is now configured to use the cluster.” What this is supposed to do is to eventually set the current context for the kubectl utility so that it knows which cluster it is talking to. Behind the scenes in your %HOMEPATH%.kube directory, there is a config file that contains information about your Kubernetes cluster and the details for connecting to your various clusters is present over there.
In short, we have to be sure that the kubectl is pointing to the right cluster. In our case, the cluster name is minikube.
In case you see an error like the one below (I got it a few times), then you need to probably set the context again.
PS C:> kubectl get nodes
error: You must be logged in to the server (the server has asked for the client to provide credentials)
The command for that is:
PS C:> kubectl config use-context minikube
switched to context "minikube".
Running a Workload
Let us proceed now to running a simple Nginx container to see the whole thing in action:
We are going to use the run command as shown below:
PS C:> .kubectl.exe run hello-nginx --image=nginx --port=80
deployment "hello-nginx" created
This creates a deployment and we can investigate into the Pod that gets created, which will run the container:
PS C:> .kubectl.exe get pods
NAME                   READY     STATUS              RESTARTS   AGE
hello-nginx-24710...   0/1       ContainerCreating   0          2m
You can see that the STATUS column value is ContainerCreating.
Now, let us go back to the Dashboard (I am assuming that you either have it running or can launch it again via the minikube dashboard command):

You can notice that if we go to the Deployments option, the Deployment is listed and the status is still in progress. You can also notice that the Pods value is 0/1.
If we wait for a while, the Pod will eventually get created and it will ready as the command below shows:
PS C:> .kubectl.exe get pods
NAME                   READY     STATUS    RESTARTS   AGE
hello-nginx-24710...   1/1       Running   0          3m
If we see the Dashboard again, the Deployment is ready now:

If we visit the Replica Sets now, we can see it:

Click on the Replica Set name and it will show the Pod details as given below:

Alternately, you can also get to the Pods via the Pods link in the Workloads as shown below:

Click on the Pod and you can get various details on it as given below:

You can see that it has been given some default labels. You can see its IP address. It is part of the node named minikube. And most importantly, there is a link for View Logs too.
The 1.4 dashboard greatly simplifies using Kubernetes and explaining it to everyone. It helps to see what is going on in the Dashboard and then the various commands in kubectl will start making sense more.
We could have got the Node and Pod details via a variety of kubectl describe node/pod commands and we can still do that. An example of that is shown below:
PS C:> .kubectl.exe describe pod hello-nginx-2471083592-4vfz8
Name:           hello-nginx-2471083592-4vfz8
Namespace:      default
Node:           minikube/192.168.99.100
Start Time:     Tue, 04 Oct 2016 14:05:15 +0530
Labels:         pod-template-hash=2471083592
                run=hello-nginx
Status:         Running
IP:             172.17.0.3
Controllers:    ReplicaSet/hello-nginx-2471083592
Containers:
  hello-nginx:
    Container ID:       docker://98a9e303f0dbf21db80a20aea744725c9bd64f6b2ce2764379151e3ae422fc18
    Image:              nginx
    Image ID:           docker://sha256:ba6bed934df2e644fdd34e9d324c80f3c615544ee9a93e4ce3cfddfcf84bdbc2
    Port:               80/TCP
    State:              Running
      Started:          Tue, 04 Oct 2016 14:06:02 +0530
    Ready:              True
    Restart Count:      0
    Volume Mounts:
      /var/run/secrets/kubernetes.io/serviceaccount from default-token-rie7t (ro)
    Environment Variables:      <none>
..... /// REST OF THE OUTPUT ////
Expose a Service
It is time now to expose our basic Nginx deployment as a service. We can use the command shown below:
PS C:> .kubectl.exe expose deployment hello-nginx --type=NodePort
service "hello-nginx" exposed
If we visit the Dashboard at this point and go to the Services section, we can see out hello-nginx service entry.

Alternately, we can use kubectl too, to check it out:
PS C:> .kubectl.exe get services
NAME          CLUSTER-IP   EXTERNAL-IP   PORT(S)   AGE
hello-nginx   10.0.0.24    <nodes>       80/TCP    3m
kubernetes    10.0.0.1     <none>        443/TCP   1h
PS C:> .kubectl.exe describe service hello-nginx
Name:                   hello-nginx
Namespace:              default
Labels:                 run=hello-nginx
Selector:               run=hello-nginx
Type:                   NodePort
IP:                     10.0.0.24
Port:                   <unset> 80/TCP
NodePort:               <unset> 31155/TCP
Endpoints:              172.17.0.3:80
Session Affinity:       None
No events.
We can now use the minikube service to understand the URL for the service as shown below:
PS C:> .minikube.exe service --url=true hello-nginx
http://192.168.99.100:31155
Alternately, if we do not use the url flag, then it can directly launch the browser and hit the service endpoint:
PS C:> .minikube.exe service hello-nginx
Opening kubernetes service default/hello-nginx in default browser...

View Logs
Assuming that you have accessed the service once in the browser as shown above, let us look at an interesting thing now. Go to the Service link in the Dashboard.

Click on the hello-nginx service. This will also show the list of Pods (single) as shown below. Click on the icon for Logs as highlighted below:

This will show the logs for that particular Pod and with HTTP Request calls that was just made.

You could do the same by using the logs <podname> command for the kubectl CLI:
PS C:> .kubectl logs hello-nginx-2471083592-4vfz8
172.17.0.1 - - [04/Oct/2016:09:00:33 +0000] "GET / HTTP/1.1" 200 612 "-" "Mozilla/5.0 (Windows NT 10.0; Win64; x64) Appl
eWebKit/537.36 (KHTML, like Gecko) Chrome/53.0.2785.143 Safari/537.36" "-"
2016/10/04 09:00:33 [error] 5#5: *1 open() "/usr/share/nginx/html/favicon.ico" failed (2: No such file or directory), cl
ient: 172.17.0.1, server: localhost, request: "GET /favicon.ico HTTP/1.1", host: "192.168.99.100:31155", referrer: "http
://192.168.99.100:31155/"
172.17.0.1 - - [04/Oct/2016:09:00:33 +0000] "GET /favicon.ico HTTP/1.1" 404 571 "http://192.168.99.100:31155/" "Mozilla/
5.0 (Windows NT 10.0; Win64; x64) AppleWebKit/537.36 (KHTML, like Gecko) Chrome/53.0.2785.143 Safari/537.36" "-"
PS C:>
Scaling the Service
OK, I am not yet done!
When we created the deployment, we did not mention about the number of instances for our service. So we just had one Pod that was provisioned on the single node.
Let us go and see how we can scale this via the scale command. We want to scale it to 3 Pods.
PS C:> .kubectl scale --replicas=3 deployment/hello-nginx
deployment "hello-nginx" scaled
We can see the status of the deployment in a while:
PS C:> .kubectl.exe get deployment
NAME          DESIRED   CURRENT   UP-TO-DATE   AVAILABLE   AGE
hello-nginx   3         3         3            3           1h
Now, if we visit the Dashboard for our Deployment:
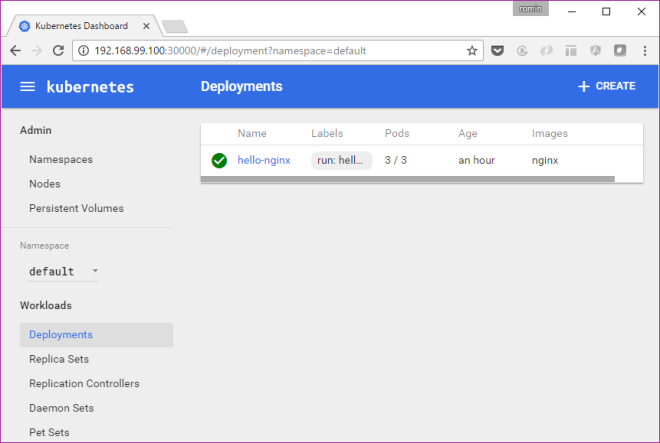
We have the 3/3 Pods available. Similarly, we can see our Service or Pods.

or the Pod list:
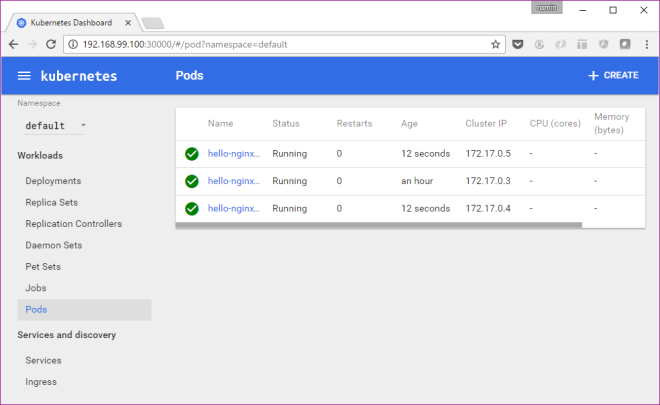
Stopping and Deleting the Cluster
This is straightforward. You can use the stop and delete commands for minikube utility.
Limitations
Minikube is a work in progress at this moment and it does not support all the features of Kubernetes. Please refer to the minikube documentation, where it clearly states what is currently supported.
Troubleshooting Issues on Windows 10
My experience to get the experimental build of minikube working on Windows was not exactly a smooth one, but that is to be expected from anything that calls itself experimental.
I faced several issues and hope that it will save some time for you. I do not have the time to investigate deeper into why some of the stuff worked for me since my focus is to get it up and running on Windows. So if you have some specific comments around that, that will be great and I can add to this blog post.
In no order of preference, here you go:
Use Powershell
I used Powershell and not command line. Ensure that Powershell is launched in Administrative mode. This means Ctrl + Shift + Enter.
Put minikube.exe file in C: drive
I saw some issues that mentioned to do that. I did not experiment too much and went with C: drive.
Clear up .minikube directory
If there were some issues starting up minikube first time and then you try to start it again, you might see errors that say stuff like “Starting Machine” or “Machine exists” and then a bunch of errors before it gives up. I suggest that you clear up the .minikube directory that is present in %HOMEPATH%.minikube directory. In my case, it is C:Usersirani_r.minikube. You will see a bunch of folders there. Just delete them all and start all over again.
To see detailed error logging, give the following flags while starting up the cluster:
--show-libmachine-logs --alsologtostderr
Example of the error trace for me was as follows:
PS C:> .minikube start --show-libmachine-logs --alsologtostderr
W1003 15:59:52.796394   12080 root.go:127] Error reading config file at C:Usersirani_r.minikubeconfigconfig.json: o
pen C:Usersirani_r.minikubeconfigconfig.json: The system cannot find the file specified.
I1003 15:59:52.800397   12080 notify.go:103] Checking for updates...
Starting local Kubernetes cluster...
I1003 15:59:53.164759   12080 cluster.go:75] Machine exists!
I1003 15:59:54.133728   12080 cluster.go:82] Machine state:  Error
E1003 15:59:54.133728   12080 start.go:85] Error starting host: Error getting state for host: machine does not exist. Re
trying.
I1003 15:59:54.243132   12080 cluster.go:75] Machine exists!
I1003 15:59:54.555738   12080 cluster.go:82] Machine state:  Error
E1003 15:59:54.555738   12080 start.go:85] Error starting host: Error getting state for host: machine does not exist. Re
trying.
I1003 15:59:54.555738   12080 cluster.go:75] Machine exists!
I1003 15:59:54.790128   12080 cluster.go:82] Machine state:  Error
E1003 15:59:54.790128   12080 start.go:85] Error starting host: Error getting state for host: machine does not exist. Re
trying.
E1003 15:59:54.790128   12080 start.go:91] Error starting host:  Error getting state for host: machine does not exist
Error getting state for host: machine does not exist
Error getting state for host: machine does not exist
Disable Hyper-V
As earlier mentioned, VirtualBox and Hyper-V are not the happiest of co-workers. Definitely disable one of them on your machine. As per the documentation of minikube, both virtualbox and hyperv drivers are supported on Windows. I will do a test of Hyper-V someday but I went with disabling Hyper-V and used VirtualBox only. The steps to disable Hyper-V correctly were shown earlier in this blog post.
Install KVM Hypervisor on CentOS 7.x and RHEL 7.x
KVM is an open source hardware virtualization software through which we can create and run multiple Linux based and windows based virtual machines simultaneously. KVM is known as Kernel based Virtual Machine because when we install KVM package then KVM module is loaded into the current kernel and turns our Linux machine into a hypervisor.
In this post first we will demonstrate how we can install KVM hypervisor on CentOS 7.x and RHEL 7.x and then we will try to install virtual machines.
Before proceeding KVM installation, let’s check whether your system’s CPU supports Hardware Virtualization.
Run the beneath command from the console.
[root@linuxtechi ~]# grep -E '(vmx|svm)' /proc/cpuinfo
We should get the word either vmx or svm in the output, otherwise CPU doesn’t support virtualization.
Step:1 Install KVM and its associate packages
Run the following yum command to install KVM and its associated packages.
[root@linuxtechi ~]# yum install qemu-kvm qemu-img virt-manager libvirt libvirt-python libvirt-client virt-install virt-viewer bridge-utils
Start and enable the libvirtd service
[root@linuxtechi ~]# systemctl start libvirtd
[root@linuxtechi ~]# systemctl enable libvirtd
Run the beneath command to check whether KVM module is loaded or not
[root@linuxtechi ~]# lsmod | grep kvm
kvm_intel             162153  0
kvm                   525409  1 kvm_intel
[root@linuxtechi ~]#
Ansible cheat sheet
Configuration file
First one found from of
- Contents of
$ANSIBLE_CONFIG ./ansible.cfg~/.ansible.cfg/etc/ansible/ansible.cfg
Configuration settings can be overridden by environment variables – see constants.py in the source tree for names.
Patterns
Used on the ansible command line, or in playbooks.
all(or*)- hostname:
foo.example.com - groupname:
webservers - or:
webservers:dbserver - exclude:
webserver:!phoenix - intersection:
webservers:&staging
Operators can be chained: webservers:dbservers:&staging:!phoenix
Patterns can include variable substitutions: {{foo}}, wildcards: *.example.com or 192.168.1.*, and regular expressions: ~(web|db).*.example.com
Inventory files
intro_inventory.html, intro_dynamic_inventory.html
‘INI-file’ structure, blocks define groups. Hosts allowed in more than one group. Non-standard SSH port can follow hostname separated by ‘:’ (but see also ansible_ssh_port below).
Hostname ranges: www[01:50].example.com, db-[a:f].example.com
Per-host variables: foo.example.com foo=bar baz=wibble
[foo:children]: new groupfoocontaining all members if included groups[foo:vars]: variable definitions for all members of groupfoo
Inventory file defaults to /etc/ansible/hosts. Veritable with -i or in the configuration file. The ‘file’ can also be a dynamic inventory script. If a directory, all contained files are processed.
Variable files:
YAML; given inventory file at ./hosts:
./group_vars/foo: variable definitions for all members of groupfoo./host_vars/foo.example.com: variable definitions for foo.example.com
group_vars and host_vars directories can also exist in the playbook directory. If both paths exist, variables in the playbook directory will be loaded second.
Behavioral inventory parameters:
ansible_ssh_hostansible_ssh_portansible_ssh_useransible_ssh_passansible_sudo_passansible_connectionansible_ssh_private_key_fileansible_python_interpreteransible_*_interpreter
Playbooks
playbooks_intro.html, playbooks_roles.html
Playbooks are a YAML list of one or more plays. Most (all?) keys are optional. Lines can be broken on space with continuation lines indented.
Playbooks consist of a list of one or more ‘plays’ and/or inclusions:
---
- include: playbook.yml
- <play>
- ...
Plays
playbooks_intro.html, playbooks_roles.html, playbooks_variables.html, playbooks_conditionals.html,playbooks_acceleration.html, playbooks_delegation.html, playbooks_prompts.html, playbooks_tags.html Forum postingForum postinb
Plays consist of play metadata and a sequence of task and handler definitions, and roles.
- hosts: webservers
  remote_user: root
  sudo: yes
  sudo_user: postgress
  su: yes
  su_user: exim
  gather_facts: no
  accelerate: no
  accelerate_port: 5099
  any_errors_fatal: yes
  max_fail_percentage: 30
  connection: local
  serial: 5
  vars:
    http_port: 80
  vars_files:
    - "vars.yml"
    - [ "try-first.yml", "try-second-.yml" ]
  vars_prompt:
    - name: "my_password2"
      prompt: "Enter password2"
      default: "secret"
      private: yes
      encrypt: "md5_crypt"
      confirm: yes
      salt: 1234
      salt_size: 8
  tags:
    - stuff
    - nonsence
  pre_tasks:
    - <task>
    - ...
  roles:
    - common
    - { role: common, port: 5000, when: "bar == 'Baz'", tags :[one, two] }
    - { role: common, when: month == 'Jan' }
    - ...
  tasks:
    - include: tasks.yaml
    - include: tasks.yaml foo=bar baz=wibble
    - include: tasks.yaml
      vars:
        foo: aaa
        baz:
          - z
          - y
    - { include: tasks.yaml, foo: zzz, baz: [a,b]}
    - include: tasks.yaml
      when: day == 'Thursday'
    - <task>
    - ...
  post_tasks:
    - <task>
    - ...
  handlers:
    - include: handlers.yml
    - <task>
    - ...
Using encrypt with vars_prompt requires that Passlib is installed.
In addition the source code implies the availability of the following which don’t seem to be mentioned in the documentation: name, user (deprecated), port, accelerate_ipv6, role_names, and vault_password.
Task definitions
playbooks_intro.html, playbooks_roles.html, playbooks_async.html, playbooks_checkmode.html, playbooks_delegation.html,playbooks_environment.html, playbooks_error_handling.html, playbooks_tags.html ansible-1-5-released Forum postingAnsible examples
Each task definition is a list of items, normally including at least a name and a module invocation:
- name: task
  remote_user: apache
  sudo: yes
  sudo_user: postgress
  sudo_pass: wibble
  su: yes
  su_user: exim
  ignore_errors: True
  delegate_to: 127.0.0.1
  async: 45
  poll: 5
  always_run: no
  run_once: false
  meta: flush_handlers
  no_log: true
  environment: <hash>
  environment:
    var1: val1
    var2: val2
  tags:
    - stuff
    - nonsence
  <module>: src=template.j2 dest=/etc/foo.conf
  action: <module>, src=template.j2 dest=/etc/foo.conf
  action: <module>
  args:
      src=template.j2
      dest=/etc/foo.conf
  local_action: <module> /usr/bin/take_out_of_pool {{ inventory_hostname }}
  when: ansible_os_family == "Debian"
  register: result
  failed_when: "'FAILED' in result.stderr"
  changed_when: result.rc != 2
  notify:
    - restart apache
delegate_to: 127.0.0.1 is implied by local_action:
The forms <module>: <args>, action: <module> <args>, and local_action: <module> <args> are mutually-exclusive.
Additional keys when_*, until, retries and delay are documented below under ‘Loops’.
In addition the source code implies the availability of the following which don’t seem to be mentioned in the documentation:first_available_file (deprecated), transport, connection, any_errors_fatal.
Roles
Directory structure:
playbook.yml
roles/
   common/
     tasks/
       main.yml
     handlers/
       main.yml
     vars/
       main.yml
     meta/
       main.yml
     defaults/
       main.yml
     files/
     templates/
     library/
Modules
modules.htm, modules_by_category.html
List all installed modules with
ansible-doc --list
Document a particular module with
ansible-doc <module>
Show playbook snippet for specified module
ansible-doc -i <module>
Variables
playbooks_roles.html, playbooks_variables.html
Names: letters, digits, underscores; starting with a letter.
Substitution examples:
{{ var }}{{ var["key1"]["key2"]}}{{ var.key1.key2 }}{{ list[0] }}
YAML requires an item starting with a variable substitution to be quoted.
Sources:
- Highest priority:
--extra-varson the command line
- General:
varscomponent of a playbook- From files referenced by
vars_filein a playbook - From included files (incl. roles)
- Parameters passed to includes
register:in tasks
- Lower priority:
- Inventory (set on host or group)
- Lower priority:
- Facts (see below)
- Any
/etc/ansible/facts.d/filename.facton managed machines (sets variables with `ansible_local.filename. prefix)
- Lowest priority
- Role defaults (from defaults/main.yml)
Built-in:
hostvars(e.g.hostvars[other.example.com][...])group_names(groups containing current host)groups(all groups and hosts in the inventory)inventory_hostname(current host as in inventory)inventory_hostname_short(first component of inventory_hostname)play_hosts(hostnames in scope for current play)inventory_dir(location of the inventory)inventoty_file(name of the inventory)
Facts:
Run ansible hostname -m setup, but in particular:
ansible_distributionansible_distribution_releaseansible_distribution_versionansible_fqdnansible_hostnameansible_os_familyansible_pkg_mgransible_default_ipv4.addressansible_default_ipv6.address
Content of ‘registered’ variables:
playbooks_conditionals.html, playbooks_loops.html
Depends on module. Typically includes:
.rc.stdout.stdout_lines.changed.msg(following failure).results(when used in a loop)
See also failed, changed, etc filters.
When used in a loop the result element is a list containing all responses from the module.
Additionally available in templates:
ansible_managed: string containing the information belowtemplate_host: node name of the template�s machinetemplate_uid: the ownertemplate_path: absolute path of the templatetemplate_fullpath: the absolute path of the templatetemplate_run_date: the date that the template was rendered
Filters
{{ var | to_nice_json }}{{ var | to_json }}{{ var | from_json }}{{ var | to_nice_yml }}{{ var | to_yml }}{{ var | from_yml }}{{ result | failed }}{{ result | changed }}{{ result | success }}{{ result | skipped }}{{ var | manditory }}{{ var | default(5) }}{{ list1 | unique }}{{ list1 | union(list2) }}{{ list1 | intersect(list2) }}{{ list1 | difference(list2) }}{{ list1 | symmetric_difference(list2) }}{{ ver1 | version_compare(ver2, operator='>=', strict=True }}{{ list | random }}{{ number | random }}{{ number | random(start=1, step=10) }}{{ list | join(" ") }}{{ path | basename }}{{ path | dirname }}{{ path | expanduser }}{{ path | realpath }}{{ var | b64decode }}{{ var | b64encode }}{{ filename | md5 }}{{ var | bool }}{{ var | int }}{{ var | quote }}{{ var | md5 }}{{ var | fileglob }}{{ var | match }}{{ var | search }}{{ var | regex }}{{ var | regexp_replace('from', 'to' )}}
See also default jinja2 filters. In YAML, values starting { must be quoted.
Lookups
Lookups are evaluated on the control machine.
{{ lookup('file', '/etc/foo.txt') }}{{ lookup('password', '/tmp/passwordfile length=20 chars=ascii_letters,digits') }}{{ lookup('env','HOME') }}{{ lookup('pipe','date') }}{{ lookup('redis_kv', 'redis://localhost:6379,somekey') }}{{ lookup('dnstxt', 'example.com') }}{{ lookup('template', './some_template.j2') }}
Lookups can be assigned to variables and will be evaluated each time the variable is used.
Lookup plugins also support loop iteration (see below).
Conditions
when: <condition>, where condition is:
var == "Vaue",var >= 5, etc.var, wherevarcoreces to boolean (yes, true, True, TRUE)var is defined,var is not defined<condition1> and <condition2>(alsoor?)
Combined with with_items, the when statement is processed for each item.
when can also be applied to includes and roles. Conditional Imports and variable substitution in file and template names can avoid the need for explicit conditionals.
Loops
In addition the source code implies the availability of the following which don’t seem to be mentioned in the documentation: csvfile, etcd, inventory_hostname.
Standard:
- user: name={{ item }} state=present groups=wheel
  with_items:
    - testuser1
    - testuser2

- name: add several users
  user: name={{ item.name }} state=present groups={{ item.groups }}
  with_items:
    - { name: 'testuser1', groups: 'wheel' }
    - { name: 'testuser2', groups: 'root' }

  with_items: somelist
Nested:
- mysql_user: name={{ item[0] }} priv={{ item[1] }}.*:ALL
                           append_privs=yes password=foo
  with_nested:
    - [ 'alice', 'bob', 'eve' ]
    - [ 'clientdb', 'employeedb', 'providerdb' ]
Over hashes:
Given
---
users:
  alice:
    name: Alice Appleworth
    telephone: 123-456-7890
  bob:
    name: Bob Bananarama
    telephone: 987-654-3210

tasks:
  - name: Print phone records
    debug: msg="User {{ item.key }} is {{ item.value.name }}
                     ({{ item.value.telephone }})"
    with_dict: users
Fileglob:
- copy: src={{ item }} dest=/etc/fooapp/ owner=root mode=600
  with_fileglob:
    - /playbooks/files/fooapp/*
In a role, relative paths resolve relative to the roles/<rolename>/files directory.
With content of file:
(see example for authorized_key module)
- authorized_key: user=deploy key="{{ item }}"
  with_file:
    - public_keys/doe-jane
    - public_keys/doe-john
See also the file lookup when the content of a file is needed.
Parallel sets of data:
Given
---
alpha: [ 'a', 'b', 'c', 'd' ]
numbers:  [ 1, 2, 3, 4 ]

- debug: msg="{{ item.0 }} and {{ item.1 }}"
  with_together:
    - alpha
    - numbers
Subelements:
Given
---
users:
  - name: alice
    authorized:
      - /tmp/alice/onekey.pub
      - /tmp/alice/twokey.pub
  - name: bob
    authorized:
      - /tmp/bob/id_rsa.pub

- authorized_key: "user={{ item.0.name }}
                   key='{{ lookup('file', item.1) }}'"
  with_subelements:
     - users
     - authorized
Integer sequence:
Decimal, hexadecimal (0x3f8) or octal (0600)
- user: name={{ item }} state=present groups=evens
  with_sequence: start=0 end=32 format=testuser%02x

  with_sequence: start=4 end=16 stride=2

  with_sequence: count=4
Random choice:
- debug: msg={{ item }}
  with_random_choice:
     - "go through the door"
     - "drink from the goblet"
     - "press the red button"
     - "do nothing"
Do-Until:
- action: shell /usr/bin/foo
  register: result
  until: result.stdout.find("all systems go") != -1
  retries: 5
  delay: 10
Results of a local program:
- name: Example of looping over a command result
  shell: /usr/bin/frobnicate {{ item }}
  with_lines: /usr/bin/frobnications_per_host
                       --param {{ inventory_hostname }}
To loop over the results of a remote program, use register: result and then with_items: result.stdout_lines in a subsequent task.
Indexed list:
- name: indexed loop demo
  debug: msg="at array position {{ item.0 }} there is
                                     a value {{ item.1 }}"
  with_indexed_items: some_list
Flattened list:
---
# file: roles/foo/vars/main.yml
packages_base:
  - [ 'foo-package', 'bar-package' ]
packages_apps:
  - [ ['one-package', 'two-package' ]]
  - [ ['red-package'], ['blue-package']]

- name: flattened loop demo
  yum: name={{ item }} state=installed
  with_flattened:
    - packages_base
    - packages_apps
First found:
- name: template a file
  template: src={{ item }} dest=/etc/myapp/foo.conf
  with_first_found:
    - files:
        - {{ ansible_distribution }}.conf
        - default.conf
      paths:
         - search_location_one/somedir/
         - /opt/other_location/somedir/
Tags
Both plays and tasks support a tags: attribute.
- template: src=templates/src.j2 dest=/etc/foo.conf
  tags:
    - configuration
Tags can be applied to roles and includes (effectively tagging all included tasks)
roles:
    - { role: webserver, port: 5000, tags: [ 'web', 'foo' ] }

- include: foo.yml tags=web,foo
To select by tag:
ansible-playbook example.yml --tags "configuration,packages"
ansible-playbook example.yml --skip-tags "notification"
Command lines
ansible
Usage: ansible <host-pattern> [options]

Options:
  -a MODULE_ARGS, --args=MODULE_ARGS
                        module arguments
  -k, --ask-pass        ask for SSH password
  --ask-su-pass         ask for su password
  -K, --ask-sudo-pass   ask for sudo password
  --ask-vault-pass      ask for vault password
  -B SECONDS, --background=SECONDS
                        run asynchronously, failing after X seconds
                        (default=N/A)
  -C, --check           don't make any changes; instead, try to predict some
                        of the changes that may occur
  -c CONNECTION, --connection=CONNECTION
                        connection type to use (default=smart)
  -f FORKS, --forks=FORKS
                        specify number of parallel processes to use
                        (default=5)
  -h, --help            show this help message and exit
  -i INVENTORY, --inventory-file=INVENTORY
                        specify inventory host file
                        (default=/etc/ansible/hosts)
  -l SUBSET, --limit=SUBSET
                        further limit selected hosts to an additional pattern
  --list-hosts          outputs a list of matching hosts; does not execute
                        anything else
  -m MODULE_NAME, --module-name=MODULE_NAME
                        module name to execute (default=command)
  -M MODULE_PATH, --module-path=MODULE_PATH
                        specify path(s) to module library
                        (default=/usr/share/ansible)
  -o, --one-line        condense output
  -P POLL_INTERVAL, --poll=POLL_INTERVAL
                        set the poll interval if using -B (default=15)
  --private-key=PRIVATE_KEY_FILE
                        use this file to authenticate the connection
  -S, --su              run operations with su
  -R SU_USER, --su-user=SU_USER
                        run operations with su as this user (default=root)
  -s, --sudo            run operations with sudo (nopasswd)
  -U SUDO_USER, --sudo-user=SUDO_USER
                        desired sudo user (default=root)
  -T TIMEOUT, --timeout=TIMEOUT
                        override the SSH timeout in seconds (default=10)
  -t TREE, --tree=TREE  log output to this directory
  -u REMOTE_USER, --user=REMOTE_USER
                        connect as this user (default=jw35)
  --vault-password-file=VAULT_PASSWORD_FILE
                        vault password file
  -v, --verbose         verbose mode (-vvv for more, -vvvv to enable
                        connection debugging)
  --version             show program's version number and exit
ansible-playbook
Usage: ansible-playbook playbook.yml

Options:
  -k, --ask-pass        ask for SSH password
  --ask-su-pass         ask for su password
  -K, --ask-sudo-pass   ask for sudo password
  --ask-vault-pass      ask for vault password
  -C, --check           don't make any changes; instead, try to predict some
                        of the changes that may occur
  -c CONNECTION, --connection=CONNECTION
                        connection type to use (default=smart)
  -D, --diff            when changing (small) files and templates, show the
                        differences in those files; works great with --check
  -e EXTRA_VARS, --extra-vars=EXTRA_VARS
                        set additional variables as key=value or YAML/JSON
  -f FORKS, --forks=FORKS
                        specify number of parallel processes to use
                        (default=5)
  -h, --help            show this help message and exit
  -i INVENTORY, --inventory-file=INVENTORY
                        specify inventory host file
                        (default=/etc/ansible/hosts)
  -l SUBSET, --limit=SUBSET
                        further limit selected hosts to an additional pattern
  --list-hosts          outputs a list of matching hosts; does not execute
                        anything else
  --list-tasks          list all tasks that would be executed
  -M MODULE_PATH, --module-path=MODULE_PATH
                        specify path(s) to module library
                        (default=/usr/share/ansible)
  --private-key=PRIVATE_KEY_FILE
                        use this file to authenticate the connection
  --skip-tags=SKIP_TAGS
                        only run plays and tasks whose tags do not match these
                        values
  --start-at-task=START_AT
                        start the playbook at the task matching this name
  --step                one-step-at-a-time: confirm each task before running
  -S, --su              run operations with su
  -R SU_USER, --su-user=SU_USER
                        run operations with su as this user (default=root)
  -s, --sudo            run operations with sudo (nopasswd)
  -U SUDO_USER, --sudo-user=SUDO_USER
                        desired sudo user (default=root)
  --syntax-check        perform a syntax check on the playbook, but do not
                        execute it
  -t TAGS, --tags=TAGS  only run plays and tasks tagged with these values
  -T TIMEOUT, --timeout=TIMEOUT
                        override the SSH timeout in seconds (default=10)
  -u REMOTE_USER, --user=REMOTE_USER
                        connect as this user (default=jw35)
  --vault-password-file=VAULT_PASSWORD_FILE
                        vault password file
  -v, --verbose         verbose mode (-vvv for more, -vvvv to enable
                        connection debugging)
  --version             show program's version number and exit
ansible-vault
playbooks_vault.html
Usage: ansible-vault [create|decrypt|edit|encrypt|rekey] [--help] [options] file_name

Options:
  -h, --help  show this help message and exit

See 'ansible-vault <command> --help' for more information on a specific command.
ansible-doc
Usage: ansible-doc [options] [module...]

Show Ansible module documentation

Options:
  --version             show program's version number and exit
  -h, --help            show this help message and exit
  -M MODULE_PATH, --module-path=MODULE_PATH
                             Ansible modules/ directory
  -l, --list            List available modules
  -s, --snippet         Show playbook snippet for specified module(s)
  -v                    Show version number and exit
ansible-galaxy
Usage: ansible-galaxy [init|info|install|list|remove] [--help] [options] ...

Options:
  -h, --help  show this help message and exit

  See 'ansible-galaxy <command> --help' for more information on a
  specific command
ansible-pull
Usage: ansible-pull [options] [playbook.yml]
